Want to capture stunning low-angle shots with your smartphone? Try these five tricks: First, embrace the worm's eye view to transform ordinary subjects into striking images. Next, play with reflections to add depth and intrigue to your compositions. Frame your subjects with foreground elements to create natural borders and enhance visual interest. Capture dramatic skies during golden hours for enchanting backgrounds. Finally, exploit leading lines to guide the viewer's eye and create depth in your photos. These techniques will elevate your mobile photography, turning everyday scenes into eye-catching masterpieces. Dive deeper to reveal the full potential of your smartphone camera.
Embrace the Worm's Eye View

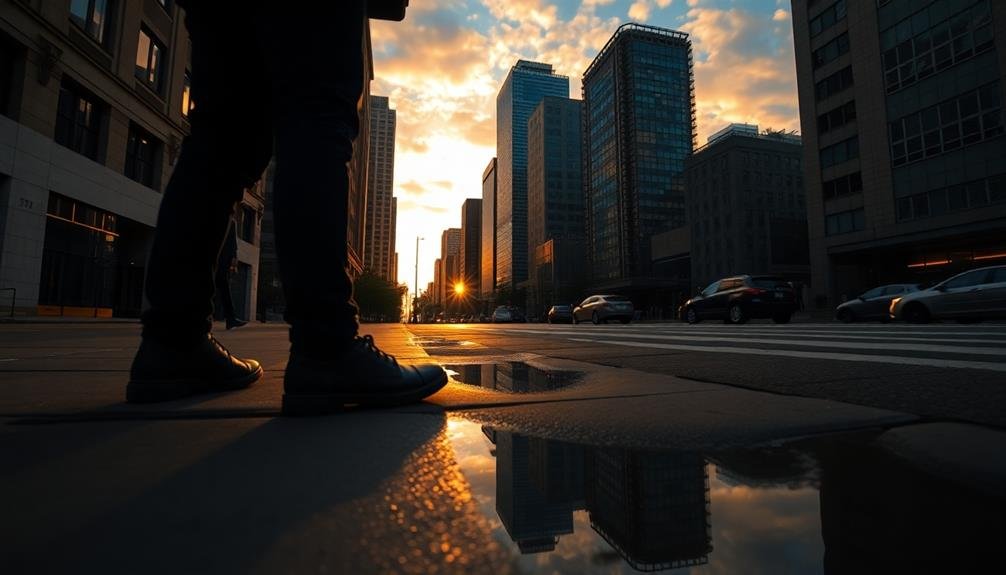
Getting down low, you'll discover a whole new perspective for your mobile photography. The worm's eye view offers a unique angle that can transform ordinary subjects into striking images. To achieve this, position your phone close to the ground, angling it upward to capture your subject from below.
This technique works particularly well for architecture, making buildings appear more imposing and dramatic. It's also effective for portraits, creating a sense of power or authority in your subject. When photographing nature, a low angle can make flowers and small plants appear larger than life, revealing intricate details often missed from eye level.
To maximize the impact of your worm's eye view shots:
- Use leading lines to draw the viewer's eye through the image.
- Experiment with different angles to find the most compelling composition.
- Include interesting foreground elements to add depth.
- Pay attention to the sky, as it often becomes a prominent part of the background.
- Try using burst mode to capture multiple shots, increasing your chances of getting the perfect image.
Remember to keep your lens clean, as shooting from ground level can expose it to dirt and debris.
Play With Reflections

Reflections offer a mesmerizing way to add depth and intrigue to your mobile photos. By incorporating reflective surfaces into your compositions, you'll create stunning images that captivate viewers and showcase your creative eye.
Look for natural reflections in puddles, lakes, or even wet pavement after rain. These surfaces can mirror the sky, buildings, or trees, doubling the visual impact of your shot.
Don't forget about man-made reflective surfaces like windows, polished metal, or mirrors. These can provide unexpected and visually striking results.
When shooting reflections, experiment with different angles. Get low to the ground for puddle shots or try tilting your phone to capture unique perspectives.
Play with partial reflections, where only a portion of the subject is mirrored, creating an intriguing visual puzzle.
Use reflections to create symmetry in your images. Position your subject so it's perfectly balanced with its reflection, or intentionally break the symmetry for a more dynamic composition.
Remember to focus on the reflection itself, not just the subject, to guarantee sharpness throughout your image.
Frame With Foreground Elements

While reflections add depth to your photos, framing with foreground elements can transform an ordinary scene into a fascinating composition. This technique involves using objects in the foreground to create a natural frame around your main subject, drawing the viewer's eye and adding layers to your image.
To frame with foreground elements, look for objects like tree branches, archways, or doorways that can partially surround your subject. Position yourself so these elements appear in the corners or edges of your frame. You'll want to maintain a balance between the framing elements and your main subject, ensuring they complement rather than overpower the shot.
When using this technique with a low-angle perspective, consider elements close to the ground like flowers, rocks, or grass. Get down low and use these to frame the bottom of your image, creating a sense of depth and leading the viewer's eye upward to your main subject.
Experiment with different apertures to control the focus between your framing elements and the subject. A wider aperture can blur the foreground, while a narrower one keeps everything sharp.
This technique works particularly well for landscapes, portraits, and architectural shots, adding context and visual interest to your mobile photography.
Capture Dramatic Skies

Dramatic skies can transform an ordinary photo into a breathtaking masterpiece. To capture these awe-inspiring scenes, you'll need to master a few techniques. First, timing is essential. The golden hours—just after sunrise and before sunset—offer the most enchanting light for sky photography. Keep an eye on weather forecasts, as stormy or partially cloudy days often produce the most dramatic results.
When shooting, use the HDR mode on your phone to balance the bright sky with darker foreground elements. Experiment with exposure compensation to highlight cloud details or create silhouettes. Don't forget to use the rule of thirds, placing the horizon line in the upper or lower third of the frame for a more dynamic composition.
| Sky Type | Best Time | Camera Setting |
|---|---|---|
| Sunrise | Dawn | Low ISO |
| Stormy | Anytime | HDR Mode |
| Sunset | Dusk | Warm WB |
Post-processing can enhance your dramatic sky photos. Use editing apps to adjust contrast, highlights, and shadows. Experiment with color temperature to create warm, golden tones or cool, moody blues. Remember, subtlety is key—avoid over-editing, which can make your images look unnatural and lose their impact.
Exploit Leading Lines

To elevate your mobile photography, mastering the use of leading lines is essential. Leading lines are powerful compositional elements that guide the viewer's eye through your image, creating depth and visual interest.
When shooting from a low angle, you'll find an abundance of potential leading lines at your feet. Look for paths, roads, or sidewalks that stretch into the distance. These natural lines can draw attention to your main subject or lead the eye to the horizon. Fences, railings, and rows of trees or buildings also make excellent leading lines.
For a more dramatic effect, try positioning yourself at the corner of a structure, using its edges to create converging lines. Don't limit yourself to straight lines; curves can be equally engaging. Rivers, winding roads, or spiraling staircases can add a sense of movement to your composition.
When framing your shot, verify the lines start from the bottom or sides of the frame and lead towards your focal point. Experiment with different angles and perspectives to find the most impactful composition.
Frequently Asked Questions
What Equipment Is Essential for Low-Angle Mobile Photography?
You don't need much for low-angle mobile photography. Your smartphone is the main tool. Consider getting a flexible tripod or stabilizer for steadier shots. A wide-angle lens attachment can enhance your perspective. Don't forget a cleaning cloth!
How Do You Protect Your Phone When Shooting at Ground Level?
To protect your phone when shooting at ground level, you'll want to use a sturdy case and screen protector. Consider a waterproof pouch for wet surfaces. Always keep a microfiber cloth handy to wipe off dirt and debris.
Are There Specific Apps That Enhance Low-Angle Mobile Photography?
Yes, there are apps to enhance low-angle mobile photography. You'll find options like VSCO, Snapseed, and ProCam that offer specialized tools for adjusting perspective, composition, and exposure. They'll help you create stunning low-angle shots with ease.
How Can You Maintain Image Quality When Digitally Zooming for Low-Angle Shots?
You can't truly maintain image quality when digitally zooming. Instead, move closer to your subject or use a clip-on lens. If you must zoom, use your phone's optical zoom feature rather than digital zoom.
What Are the Best Times of Day for Low-Angle Mobile Photography?
You'll get the best low-angle mobile shots during golden hour, just after sunrise or before sunset. The soft, warm light enhances textures and creates long shadows. Early morning and late afternoon also offer favorable lighting conditions.
In Summary
You've now got five powerful low-angle tricks in your mobile photography arsenal. Don't be afraid to get down low, experiment with reflections, and use foreground elements creatively. Remember to look up and capture those dramatic skies, and always keep an eye out for leading lines. With these techniques, you'll transform ordinary scenes into extraordinary shots. So grab your phone, get low, and start shooting. Your Instagram feed will thank you!


Leave a Reply