
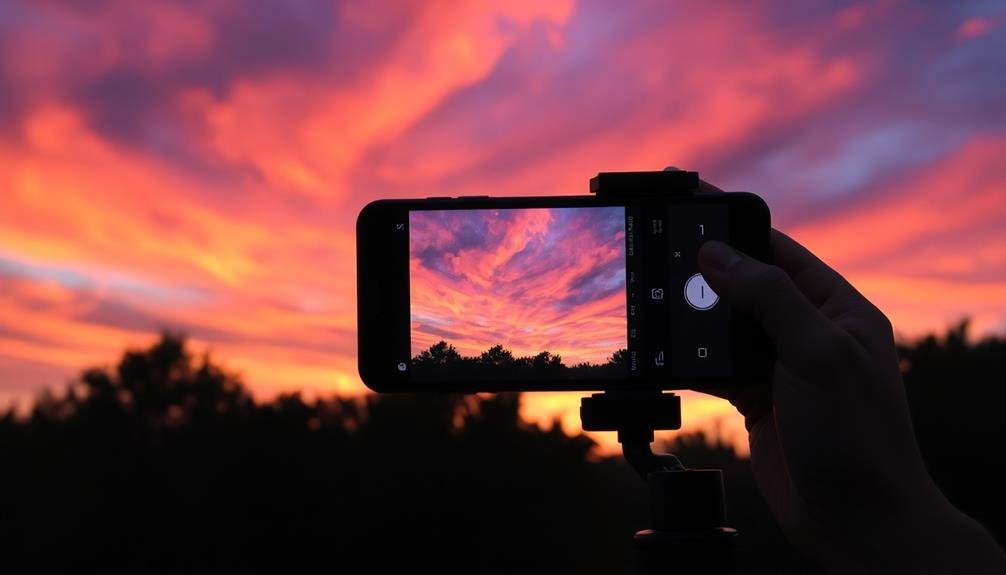
To capture stunning weather time-lapses on your mobile device, start by selecting an unobstructed location with dynamic skies. Secure your phone on a sturdy tripod or mount for stability. Adjust your camera settings, optimizing exposure, shutter speed, and ISO for the current conditions. Frame your shot to include interesting cloud formations and movements, and consider using filters to enhance colors and contrast. Pay attention to dramatic lighting changes, especially during sunrise or sunset. After shooting, edit your footage to highlight the most enthralling moments. With these tricks, you'll transform ordinary weather into extraordinary visual stories. Dive deeper to reveal even more mobile time-lapse secrets.
Choose the Perfect Location

Often, the key to capturing stunning weather time-lapses on your mobile device lies in selecting the right location. You'll want to find a spot that offers an unobstructed view of the sky and weather phenomena you're targeting. Look for elevated areas like hilltops or rooftops that provide a wide-angle perspective. Coastal regions can be ideal for capturing dramatic cloud formations and storms rolling in from the sea.
Consider the direction of the weather system's movement and position yourself accordingly. If you're shooting a sunset, face east to capture the changing colors reflected on clouds. For approaching storms, set up with the system moving towards your camera. Urban environments can offer interesting contrasts between nature and architecture, but make sure your chosen spot is safe and legal to access.
Don't forget to factor in your mobile device's limitations. Avoid areas with excessive wind that might shake your phone, and bring a portable charger for extended shoots.
Set Up a Stable Mounting System

Once you've found the perfect spot for your mobile time-lapse, you'll need to secure your device. A stable mounting system is essential for capturing smooth, professional-looking weather time-lapses. Start by investing in a sturdy tripod designed for smartphones. Look for one with adjustable legs and a ball head for precise positioning.
If you're shooting in windy conditions, consider adding weight to your tripod. Many models have a hook underneath where you can hang a bag filled with rocks or sand. This extra weight will prevent your setup from toppling over.
For longer shoots, bring a portable battery pack to keep your phone charged. Connect it to your device and secure it to the tripod leg with a velcro strap.
If you're feeling adventurous, try a suction cup mount for unique angles on windows or car exteriors. Just verify it's rated for your phone's weight and the expected weather conditions.
Lastly, use your phone's built-in level or download a leveling app to confirm your device is perfectly straight. This will prevent skewed horizons and maintain a professional look throughout your time-lapse sequence.
Adjust Camera Settings for Weather

When shooting weather time-lapses, you'll need to adjust your camera settings to match the conditions.
Start by optimizing your exposure, considering factors like cloud brightness and overall light levels.
You'll also want to set an appropriate shutter speed to capture motion effectively and choose a suitable ISO range that balances image quality with the need for light sensitivity in changing weather conditions.
Optimize Exposure for Conditions
Adjusting your camera settings in accordance with the weather conditions is essential for capturing stunning time-lapse footage. When optimizing exposure for different weather conditions, you'll need to take into account factors like lighting, movement, and atmospheric effects.
For sunny days, use a lower ISO setting to prevent overexposure and maintain image quality. Set your aperture between f/8 and f/11 for a wider depth of field, ensuring sharpness throughout the scene.
In cloudy conditions, increase your ISO slightly and open up your aperture to f/5.6 or wider to allow more light in.
During sunrise or sunset, use aperture priority mode and adjust your exposure compensation as needed to capture the changing light. For night scenes, opt for a wider aperture (f/2.8 or lower) and higher ISO to gather more light.
When shooting lightning, use a narrow aperture (f/11 or higher) and longer exposure times to capture multiple strikes.
In rainy or snowy conditions, increase your shutter speed to freeze falling droplets or flakes. Don't forget to protect your device from moisture with a waterproof case.
Set Appropriate Shutter Speed
Choosing the right shutter speed is a key factor in capturing dynamic weather events in your time-lapse sequences. You'll need to adjust this setting based on the specific weather conditions and the effect you're aiming to achieve.
For fast-moving clouds or storms, use a faster shutter speed (1/30 to 1/60 second) to freeze individual cloud shapes and maintain sharpness. This works well for capturing rapidly changing skies or approaching storm fronts.
If you're shooting slower cloud movements or want to create a smoother, more fluid appearance, opt for slower shutter speeds (1/15 to 1/4 second).
When photographing lightning, use longer exposures (1-30 seconds) to increase your chances of capturing multiple strikes in a single frame.
For rain or snow, experiment with shutter speeds between 1/60 and 1/15 second to either freeze droplets or create streak effects.
Don't forget to contemplate available light. In low-light conditions, you may need to use longer exposures to maintain proper exposure.
Always monitor your histogram and adjust your settings as lighting conditions change throughout your time-lapse sequence. By fine-tuning your shutter speed, you'll capture weather phenomena with striking clarity and impact.
Choose Suitable ISO Range
With ISO settings playing a crucial role in weather time-lapse photography, it's important to select an appropriate range for your specific conditions. For daytime shots, stick to lower ISO values between 100 and 400 to minimize noise and capture crisp details.
As light levels decrease, gradually increase your ISO to maintain proper exposure. In overcast or twilight situations, you might need to push it up to 800 or 1600.
For nighttime weather phenomena like thunderstorms or aurora borealis, you'll likely need to use higher ISO settings, potentially ranging from 3200 to 6400. However, be cautious of excessive noise that can degrade image quality. Many modern smartphones offer noise reduction features, so don't hesitate to experiment with these.
When shooting rapidly changing weather conditions, consider using auto ISO with upper and lower limits. This allows your camera to adjust sensitivity as needed while preventing extreme values.
Capture Cloud Formations and Movements

To capture stunning cloud formations and movements, you'll need to choose the ideal shooting angle.
Position your mobile device to frame the most dynamic part of the sky, ensuring you've got a clear view of the clouds' path.
Set an appropriate interval timing based on the speed of cloud movement—shorter intervals for fast-moving clouds, longer for slower formations.
Choose Optimal Shooting Angle
The perfect angle can make or break your time-lapse weather photography. When choosing your shooting angle, consider the direction of cloud movement and the sun's position. A low angle can create a dramatic effect, making clouds appear more imposing and dynamic. Conversely, a high angle offers a broader view of the sky, allowing you to capture expansive cloud patterns.
For the best results, scout your location in advance. Look for interesting foreground elements that can add depth to your composition, such as trees, buildings, or landscapes. These elements can provide context and scale to your weather time-lapse.
Don't forget to account for the sun's trajectory; shooting towards the sun can create stunning backlit clouds, while shooting away from it can highlight cloud textures.
Here are four tips to evoke emotion in your weather time-lapses:
- Frame a solitary object against a turbulent sky
- Capture the shift from stormy to clear skies
- Include human elements to show nature's scale
- Focus on rapidly changing cloud formations
Remember to adjust your angle as weather conditions evolve. Be prepared to reposition your mobile device quickly to capture sudden changes in cloud patterns or lighting conditions.
Set Appropriate Interval Timing
Selecting the right interval timing is essential for capturing stunning cloud formations and movements in your mobile time-lapse weather photography. The interval you choose depends on the speed of cloud movement and the effect you're aiming for. For slow-moving clouds, set longer intervals of 10-20 seconds between shots. This works well for cumulus clouds on a calm day.
For faster-moving clouds or more dramatic changes, use shorter intervals of 2-5 seconds. You'll need to adjust your timing based on weather conditions. Stormy weather with rapidly changing cloud patterns requires shorter intervals to capture the dynamic shifts.
Experiment with different settings to find what works best for your specific scene. Remember, longer intervals create a more dramatic time-lapse effect but might miss subtle changes, while shorter intervals provide smoother shifts but require more storage space and battery life.
Consider the overall duration of your time-lapse when setting intervals. If you're shooting a sunset over an hour, longer intervals might suffice. For a fast-moving storm front, you'll want shorter intervals to capture every detail.
Always monitor your phone's battery life and storage capacity when shooting extended time-lapses.
Frame Dramatic Lighting Changes

During dramatic weather events, capturing the shifting interplay of light and shadow can elevate your time-lapse from ordinary to extraordinary. Position your mobile device to frame the most dynamic elements of the scene, such as storm clouds rolling in or sunbeams breaking through. Anticipate how the lighting will change over time and compose your shot accordingly.
Consider including foreground elements like trees or buildings to provide context and scale to the changing sky. Pay attention to the direction of light and how it affects your subject. Side-lighting can create dramatic contrasts, while backlighting can produce stunning silhouettes. Experiment with different angles to find the most compelling composition.
Don't forget to adjust your camera settings as the light changes to maintain proper exposure throughout the time-lapse.
To create an emotional impact with your weather time-lapse, focus on:
- The awe-inspiring power of nature's fury
- The serene beauty of a clearing storm
- The hope symbolized by a rainbow emerging
- The drama of rapidly shifting cloud formations
Use Filters for Enhanced Effects
While capturing dramatic lighting changes can create stunning time-lapses, filters offer another layer of creative control.
You'll find that using filters can enhance your weather time-lapses, adding depth and mood to your shots. Start with a polarizing filter to reduce glare and deepen sky colors, especially useful for cloud formations and stormy skies. This filter can also help bring out details in rainbows or enhance the contrast between clouds and blue sky.
For sunrise or sunset time-lapses, try using graduated neutral density filters. These darken part of the frame, allowing you to balance exposure between bright skies and darker foregrounds. You'll capture more detail across the entire scene, preventing overexposed skies or underexposed landscapes.
Don't overlook color filters for creative effects. A warm filter can intensify golden hour light, while a cool filter can enhance the mood of overcast or rainy scenes.
For nighttime weather time-lapses, experiment with light pollution reduction filters to capture clearer star trails or moving clouds against a starry backdrop.
Edit and Compile Your Footage

Once you've captured your weather time-lapse footage, it's time to bring it all together. Start by importing your clips into a mobile editing app like LumaFusion or Adobe Premiere Rush. These apps offer powerful tools to enhance your footage, adjust colors, and add transitions between scenes.
Trim your clips to remove any unwanted sections and focus on the most dramatic weather changes. Experiment with the playback speed to find the perfect balance between showcasing the weather's evolution and maintaining viewer interest.
Don't forget to color grade your footage to enhance the mood and atmosphere of your time-lapse. Consider adding a subtle soundtrack to complement your visuals. Choose music that matches the weather's intensity and emotion.
Finally, export your finished product in high quality to preserve the details you've worked so hard to capture.
To elevate your weather time-lapse, try these emotionally engaging techniques:
- Highlight dramatic cloud formations that evoke awe and wonder
- Capture the raw power of approaching storms to create tension
- Showcase the transformation from stormy to clear skies for a sense of hope
- Include human elements to add relatability and scale to nature's grandeur
With these editing tips and emotional hooks, your weather time-lapse will captivate viewers and showcase nature's ever-changing beauty.
Frequently Asked Questions
How Long Should a Weather Time-Lapse Video Typically Be?
You'll want to aim for a 15-30 second time-lapse video for weather events. It's long enough to capture significant changes but short enough to maintain viewer interest. Adjust based on your specific weather phenomenon and audience preferences.
Can I Use My Smartphone's Built-In Time-Lapse Mode for Weather Photography?
Yes, you can use your smartphone's built-in time-lapse mode for weather photography. It's a convenient option that'll capture changes in clouds, sunsets, or storm formations. However, you'll need to take into account battery life and storage space limitations.
What's the Best Interval Between Shots for Capturing Weather Changes?
For capturing weather changes, you'll want to adjust your interval based on the speed of the event. Use shorter intervals (5-10 seconds) for fast-moving clouds or storms, and longer intervals (30-60 seconds) for slow-moving weather patterns.
How Do I Protect My Mobile Device From Extreme Weather Conditions?
To protect your mobile device from extreme weather, you'll want to use a waterproof case, avoid direct sunlight, and keep it at moderate temperatures. Don't forget to bring extra batteries and use a sturdy tripod for stability.
Are There Specific Apps Recommended for Weather Time-Lapse Photography?
You'll find several great apps for weather time-lapse photography. Try Lapse It, Hyperlapse, or TimeLapse Pro. They offer features like interval settings, exposure control, and stabilization. Don't forget to experiment with built-in time-lapse modes on your phone's camera app.
In Summary
You've now got the tools to create stunning weather time-lapses on your mobile device. Remember to scout locations, stabilize your setup, and fine-tune your camera settings. Don't forget to capture cloud movements and dramatic lighting changes. Experiment with filters for added flair. Once you've got your footage, edit and compile it to create a breathtaking final product. With practice, you'll be producing professional-quality weather time-lapses that'll wow your audience. Keep shooting and refining your skills!


Leave a Reply