Transform your smartphone street photography with these black-and-white hacks. Embrace high contrast by seeking stark light-dark differences and adjusting exposure. Master composition techniques like the rule of thirds and leading lines. Utilize manual controls to capture motion or freeze action. Experiment with shadows and silhouettes for dramatic effects. Edit with monochrome filters to enhance contrast and mood. Focus on textures and patterns to add visual interest. Finally, capture decisive moments by staying alert and using burst mode. These tips will elevate your urban snapshots from ordinary to extraordinary. Dive deeper to reveal even more potential in your monochrome mobile photography.
Embrace High Contrast

Shadows and light dance in black-and-white street photography, creating drama and depth. To capture this interplay on your smartphone, embrace high contrast. Look for scenes with stark differences between light and dark areas. Seek out strong sunlight casting deep shadows, or bright artificial lighting in dimly lit urban spaces.
Use your phone's exposure controls to emphasize these contrasts. Tap on the brightest part of the scene to darken the overall image, making shadows more pronounced. Alternatively, focus on the darkest area to create dramatic silhouettes against bright backgrounds. Don't be afraid to push the limits; high-contrast scenes often translate beautifully to black and white.
Experiment with different times of day. Early morning and late afternoon offer long shadows and directional light, perfect for creating striking contrasts. Midday sun can produce harsh, graphic shadows on buildings and streets. In overcast conditions, look for artificial light sources to create contrast.
When editing, boost contrast and adjust highlights and shadows to further emphasize the light-dark interplay. This will give your black-and-white street photos a timeless, impactful quality that draws the viewer's eye and evokes emotion.
Master Composition Techniques

Composition techniques can make or break your black-and-white street photography, even when shooting with a smartphone. To elevate your images, focus on mastering key compositional elements.
Start by utilizing the rule of thirds: imagine your frame divided into a 3×3 grid and place your main subject along these lines or at their intersections. This creates a more balanced and visually appealing image.
Next, pay attention to leading lines. Look for natural lines in the urban environment, such as roads, buildings, or shadows, that can guide the viewer's eye through the frame. These lines add depth and structure to your black-and-white shots.
Don't forget about symmetry and patterns, which can be particularly striking in monochrome. Seek out repetitive elements or mirror-like reflections to create visually compelling compositions.
Experiment with negative space to emphasize your subject and create a sense of isolation or drama. In busy street scenes, try framing your subject with architectural elements or other people to add context and depth.
Utilize Manual Exposure Controls

While mastering composition is key, taking control of your phone's exposure settings can dramatically improve your black-and-white street photography. Most smartphone cameras offer manual exposure controls, allowing you to adjust shutter speed, ISO, and sometimes aperture.
Start by experimenting with shutter speed to capture motion or freeze action. For dynamic street scenes, try a slower shutter speed to create intentional blur, or use a faster one to sharply capture fleeting moments.
Next, focus on ISO settings. In low-light situations, increase the ISO to brighten your image, but be mindful of introducing noise. For high-contrast scenes, common in black-and-white photography, you might need to adjust your exposure compensation. Underexposing slightly can help preserve highlights and create more dramatic shadows.
Don't forget about your phone's HDR mode. While it's typically used for color photography, it can be beneficial in high-contrast black-and-white scenes, helping to retain detail in both shadows and highlights.
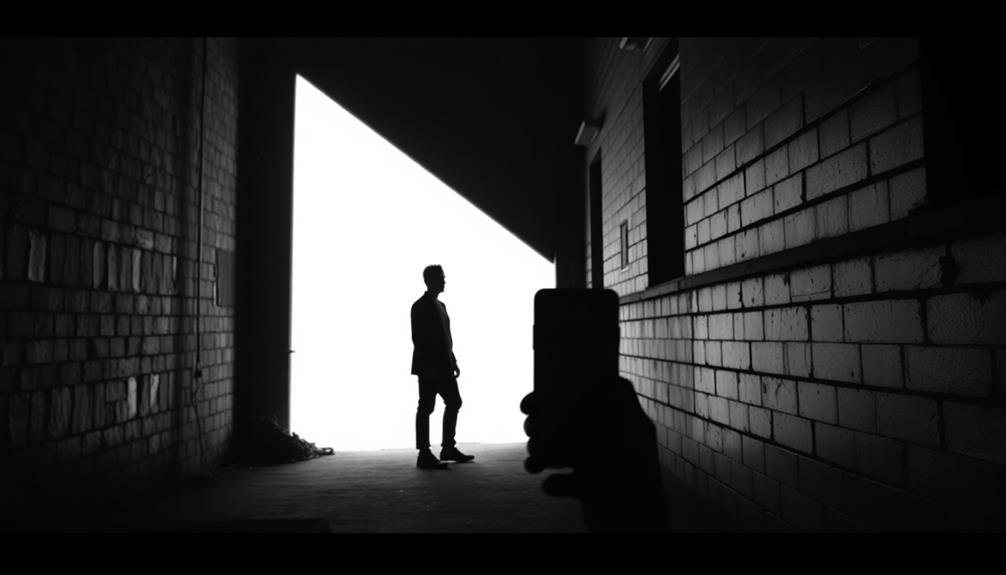
Experiment With Shadows and Silhouettes

Black-and-white street photography thrives on contrast, and there's no better way to achieve this than by experimenting with shadows and silhouettes. Look for scenes where strong light creates deep shadows or backlit subjects that form striking silhouettes.
Position yourself to capture the interplay between light and dark areas, using these elements to frame your subjects or create intriguing patterns.
When shooting shadows, focus on their shapes and textures. Long shadows cast by people or objects can add depth and drama to your compositions.
Try capturing multiple shadows intersecting or overlapping for a more complex image. For silhouettes, expose for the bright background to turn your subjects into dark outlines. This technique works particularly well during golden hour or against bright urban lights.
Don't be afraid to push the contrast in post-processing. Increase the blacks and whites to make your shadows deeper and highlights brighter.
This will enhance the graphic quality of your images, making them more impactful in black and white. Remember, the key is to simplify your compositions, letting the interplay of light and shadow tell the story of the street scene you're capturing.
Edit With Monochrome Filters

When editing your black-and-white street photos, you'll need to decide between using preset monochrome filters or creating custom ones.
Preset filters offer quick, one-tap solutions, while custom adjustments allow for more precise control over contrast, brightness, and tonal range.
Experiment with high-contrast monochrome effects to add drama and emphasize the interplay of light and shadow in your street scenes.
Preset vs. Custom Filters
Editing your black-and-white street photos with monochrome filters offers two main approaches: preset and custom filters.
Preset filters provide quick, one-tap solutions for applying predefined black-and-white looks to your images. They're ideal when you're short on time or want consistent results across multiple photos. Most editing apps offer a variety of preset monochrome filters, ranging from high-contrast dramatic looks to softer, more nuanced tones.
Custom filters, on the other hand, give you more control over the final result. You'll adjust individual parameters like contrast, brightness, and tonal range to achieve your desired look. This approach allows for greater creativity and helps you develop a unique style. It's particularly useful when you want to emphasize specific elements in your street scene or create a mood that preset filters can't capture.
To decide between preset and custom filters, consider your goals and available time. If you're aiming for quick edits or a cohesive series, presets might be your best bet. For more refined, personalized results, custom filters are worth the extra effort.
Experiment with both approaches to find what works best for your black-and-white street photography style.
High-Contrast Monochrome Effects
High-contrast monochrome effects can transform your street photography, giving it a dramatic and timeless quality. To achieve this look, you'll need to manipulate your phone's settings or use editing apps that offer advanced black-and-white filters.
Start by increasing the contrast in your images. This will deepen the blacks and brighten the whites, creating a stark, impactful look. Next, adjust the exposure to enhance highlights and shadows. You can also experiment with clarity and structure settings to bring out textures and details in your monochrome shots.
Here's a quick guide to achieving high-contrast monochrome effects:
| Setting | Low Contrast | High Contrast |
|---|---|---|
| Blacks | Lifted | Crushed |
| Whites | Muted | Bright |
| Midtones | Preserved | Reduced |
Don't forget to play with grain and vignetting to add depth and focus to your images. Some apps offer preset filters that mimic classic black-and-white film stocks, which can be a great starting point for your edits.
Focus on Textures and Patterns

Black and white photography thrives on contrasts, and one of the best ways to achieve this is through textures and patterns. When shooting street scenes with your phone, look for surfaces and objects that offer interesting tactile qualities or repetitive designs. Brick walls, cobblestone streets, and weathered wood can add depth and visual interest to your monochrome images.
To capture textures effectively, get close to your subject and experiment with different angles. Use your phone's manual focus feature to guarantee sharp details.
For patterns, try shooting from a distance to showcase repetitive elements like windows on a building or a row of street lamps. Play with symmetry and leading lines to create compelling compositions.
Don't forget about shadows and light. They can enhance textures and create their own patterns. Shoot during golden hour or harsh midday sun to maximize contrast.
Use your phone's HDR mode to capture a wider range of tones, especially in challenging lighting conditions. Remember to adjust your exposure settings to prevent blown-out highlights or loss of detail in shadows.
Capture Decisive Moments

Capturing decisive moments is often the hallmark of great street photography. In black-and-white, these moments become even more powerful, stripping away distractions and focusing on raw emotion and action. To master this skill with your smartphone, you'll need quick reflexes and a keen eye for unfolding scenes.
First, always keep your phone ready. Enable quick-launch camera features and practice accessing your camera app swiftly. Anticipate potential moments by observing your surroundings and predicting where action might occur. Look for interactions, expressions, and gestures that tell a story.
Use burst mode to capture a series of shots, increasing your chances of getting the perfect frame. Don't be afraid to take multiple photos of the same scene. Remember, timing is everything in street photography.
Here's a quick guide to help you capture decisive moments:
| Technique | Purpose | Example |
|---|---|---|
| Pre-focus | Faster shooting | Focus on a spot where action might occur |
| Zone focusing | Capture moving subjects | Set focus to 5-10 feet for passing subjects |
| Continuous AF | Track moving subjects | Use for following a subject through a scene |
| High shutter speed | Freeze action | 1/500s or faster for sharp, crisp images |
Practice these techniques regularly, and you'll soon find yourself capturing powerful black-and-white street moments with ease.
Frequently Asked Questions
How Do I Protect My Smartphone From Theft While Doing Street Photography?
To protect your smartphone while doing street photography, keep it close to your body and use a wrist strap. Stay aware of your surroundings, avoid crowded areas, and consider using a discreet camera app to minimize attention.
Can I Legally Photograph Strangers on the Street Without Their Permission?
You can legally photograph strangers in public spaces without permission in most countries. However, it's ethical to respect people's privacy and comfort. If someone objects, it's best to delete their photo or move on.
What's the Best Smartphone Lens Attachment for Black-And-White Street Photography?
For black-and-white street photography, you'll want a wide-angle lens attachment. A 18mm or 24mm equivalent works great. It'll capture more of the scene, letting you include more context and create dramatic compositions. Try Moment or Olloclip lenses.
How Can I Stabilize My Phone for Low-Light Street Scenes?
To stabilize your phone for low-light street scenes, you'll want to use a mini tripod or grip. You can also lean against walls, use railings, or hold your breath while shooting. Don't forget to enable night mode.
Are There Specific Weather Conditions That Enhance Black-And-White Street Photos?
Yes, certain weather enhances black-and-white street photos. You'll find fog creates ethereal scenes, rain adds reflections and textures, and overcast days offer soft, even lighting. Harsh sunlight can also produce dramatic shadows and contrasts.
In Summary
You've now got a toolkit of black-and-white street photography techniques for your smartphone. By embracing contrast, mastering composition, and using manual controls, you'll create striking images. Don't forget to play with shadows, edit with monochrome filters, and focus on textures. Most importantly, always be ready to capture those decisive moments. With practice, you'll transform ordinary street scenes into extraordinary black-and-white art using just your phone. Keep shooting and refining your craft!


Leave a Reply