
To perfect RAW mobile photos, focus on composition and editing. Start by mastering the Rule of Thirds, using leading lines, and framing your subject effectively. When editing, crop for impact and adjust perspective to fix tilted horizons and converging verticals. Balance elements in post-processing by identifying your main subject and guiding the viewer's eye. Fine-tune color and contrast by adjusting white balance, enhancing overall contrast, and experimenting with color grading tools. Don't forget to leverage RAW's greater editing flexibility for detailed adjustments in highlights, shadows, and color depth. Dive deeper to access your smartphone camera's full potential.
Understanding RAW Mobile Photography
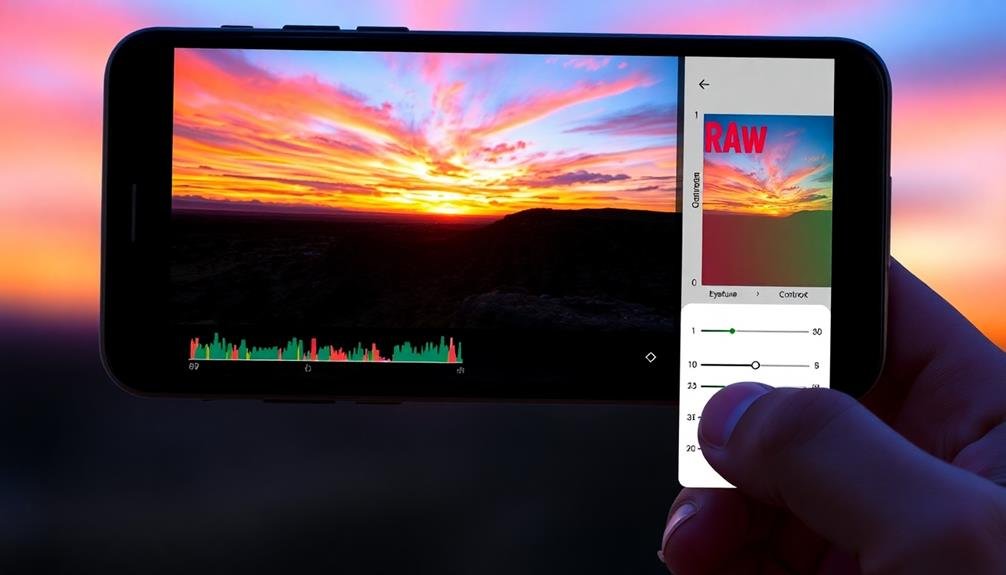
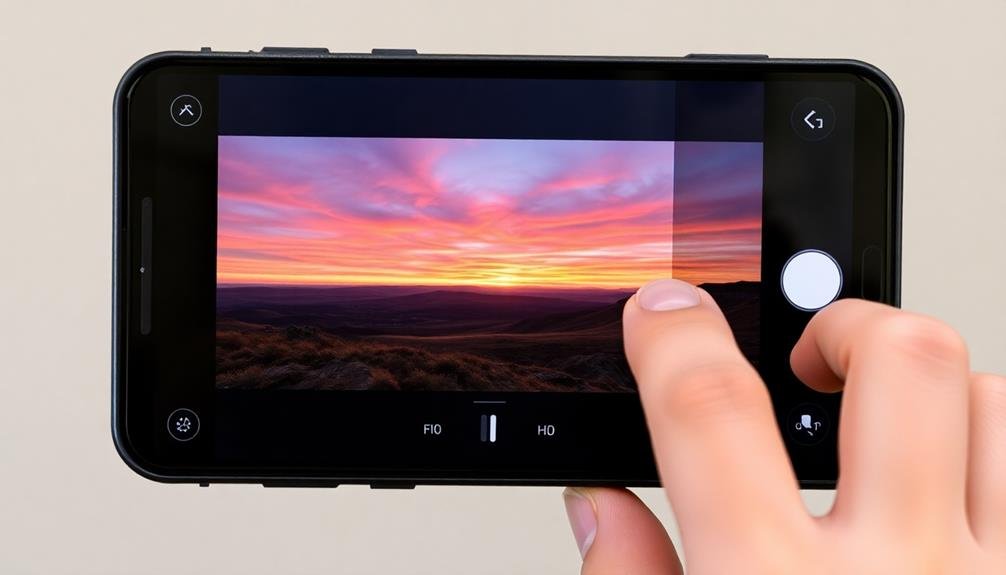
Three key aspects define RAW mobile photography: uncompressed data, greater editing flexibility, and increased file size.
When you shoot in RAW format on your mobile device, you're capturing all the image data your camera sensor detects, without any in-camera processing or compression. This uncompressed data allows for more extensive post-processing options, giving you greater control over your final image.
RAW files retain more information about highlights, shadows, and color depth, enabling you to recover details that might be lost in compressed formats like JPEG. You'll have more latitude to adjust exposure, white balance, and color without degrading image quality.
However, RAW files are considerably larger than their JPEG counterparts, so you'll need to manage your device's storage carefully.
To make the most of RAW mobile photography, you'll need compatible editing apps that can process these files. Many professional-grade mobile editing apps now support RAW editing, allowing you to fine-tune your images directly on your device.
As you become more comfortable with RAW editing, you'll appreciate the enhanced dynamic range and color accuracy it offers, elevating your mobile photography to new heights.
Essential Composition Principles

To elevate your mobile photography, you'll want to master key composition principles.
Start by applying the Rule of Thirds, which helps you create balanced and visually appealing images.
Then, look for Leading Lines to guide the viewer's eye through your photo, and experiment with Framing techniques to draw attention to your main subject.
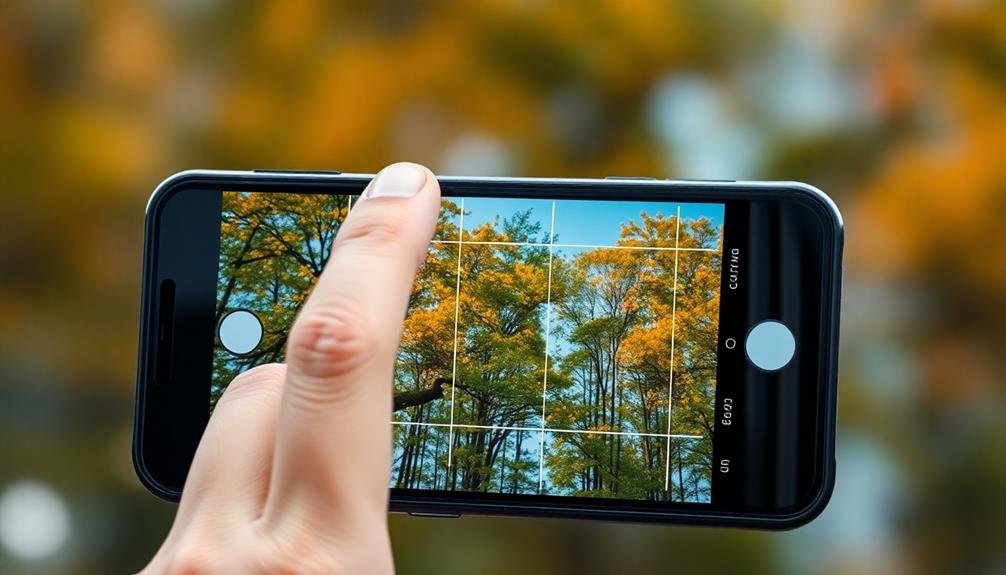
Rule of Thirds
Why is the Rule of Thirds considered a fundamental principle in photography composition? This guideline divides your frame into a 3×3 grid, creating nine equal parts. By placing key elements along these lines or at their intersections, you'll create more balanced and visually appealing images.
To apply the Rule of Thirds in your mobile photos, enable the grid feature in your camera app. As you frame your shot, position your main subject at one of the intersecting points. This off-center placement creates tension and interest, drawing the viewer's eye naturally through the image.
For landscapes, align the horizon with either the top or bottom horizontal line. In portraits, position your subject's eyes along the upper third.
When capturing action, leave space in front of the moving subject to create a sense of direction.
Leading Lines
Visual flow is key to creating compelling mobile photographs, and leading lines are a powerful tool to achieve this effect. These lines, whether natural or man-made, guide the viewer's eye through the image, creating depth and drawing attention to your main subject.
To incorporate leading lines effectively, start by identifying potential lines in your environment. Look for roads, paths, fences, or even natural formations like rivers or tree branches. Once you've spotted these elements, position yourself to use them strategically in your composition. Aim to have the lines originate from the corners or edges of your frame, directing the eye inward.
You can use leading lines to create various moods and effects. Straight lines convey stability and strength, while curved lines add a sense of movement and fluidity. Diagonal lines can introduce dynamism and tension.
Experiment with different angles and perspectives to maximize the impact of these lines.
When editing your mobile photos, enhance the leading lines by adjusting contrast, clarity, or even selectively brightening them. This will further emphasize their role in guiding the viewer's gaze and strengthening your composition.
Framing the Subject
When it comes to mobile photography, framing your subject is a fundamental principle that can dramatically enhance your compositions. By using elements in your environment to create a natural border around your main subject, you'll draw the viewer's attention and add depth to your image. Look for opportunities to frame your subject using doorways, windows, arches, or even natural elements like tree branches or rock formations.
To effectively frame your subject, consider these techniques:
- Use foreground elements to create a sense of depth.
- Experiment with symmetrical and asymmetrical framing.
- Pay attention to negative space around the frame.
As you're composing your shot, move around to find the best angle that incorporates both your subject and the framing elements.
Don't be afraid to get creative with unconventional frames, such as using shadows or reflections. Remember that framing doesn't always have to completely surround your subject; partial frames can be just as effective in guiding the viewer's eye.
Cropping for Impact
Cropping is one of the most powerful tools in your mobile photo editing arsenal. It allows you to refine your composition, remove distractions, and emphasize your subject. When cropping, consider the rule of thirds, which divides your image into a 3×3 grid. Place key elements along these lines or at their intersections to create a more balanced and visually appealing photo.
Don't be afraid to experiment with different aspect ratios. A square crop can work well for social media platforms like Instagram, while a wider panoramic crop might better suit landscape shots. Remember, cropping can also help you correct slight compositional errors made during shooting.
Here's a quick guide to different cropping approaches:
| Crop Type | Best For | Effect |
|---|---|---|
| Tight | Portraits | Intimacy |
| Wide | Landscapes | Expansiveness |
| Square | Social Media | Symmetry |
When cropping, always keep your subject's importance in mind. Avoid cutting off essential parts of your subject, and guarantee that the crop enhances rather than detracts from your intended message. By mastering the art of cropping, you'll greatly improve your mobile photography's impact and visual appeal.
Adjusting Perspective and Alignment
After cropping your mobile photos for impact, you'll want to address perspective and alignment issues.
Start by fixing tilted horizons to guarantee your landscapes appear level and natural.
Next, correct converging verticals in architectural shots and straighten building lines to maintain the integrity of structures in your images.
Fix Tilted Horizons
Tilted horizons can throw off an otherwise great photo, but with a few simple adjustments, you'll be able to fix this common issue. Most mobile photo editing apps offer a straighten or rotate tool, which allows you to align your horizon perfectly. Look for a gridline overlay to guide you as you make adjustments.
Pay attention to natural horizontal lines in your image, such as the ocean's edge, building rooftops, or even the line where land meets sky.
When fixing tilted horizons, keep these key points in mind:
- Subtle adjustments often work best
- Don't sacrifice important elements in the frame
- Use the rule of thirds grid as a reference
If your photo lacks obvious horizontal lines, try using vertical elements as a guide. Trees, buildings, or poles can help you determine if your image is straight.
Remember that some scenes, like mountain ranges, may have naturally uneven horizons. In these cases, trust your eye and aim for a balanced composition.
Don't be afraid to crop your image after straightening to remove any empty spaces created by the rotation.
Correct Converging Verticals
In accordance with visual appeal, correcting converging verticals is an essential step in enhancing your mobile photos. When you're shooting tall buildings or structures, your camera's perspective can cause vertical lines to appear as if they're converging towards the top. This distortion can make your images look unnatural and less professional.
To fix this issue, use your photo editing app's perspective correction tool. Look for options like "vertical," "tilt," or "keystone." Adjust the sliders carefully until the vertical lines in your image appear parallel. Be mindful not to overcorrect, as this can create an unnatural look in the opposite direction.
Here's a quick guide to common perspective issues and their corrections:
| Issue | Correction | Before | After |
|---|---|---|---|
| Converging verticals | Vertical perspective | Angled | Straight |
| Tilted horizon | Rotation | Sloped | Level |
| Distorted proportions | Aspect ratio | Stretched | Balanced |
| Keystoning | Horizontal perspective | Trapezoidal | Rectangular |
Straighten Architectural Lines
Building on the concept of correcting converging verticals, straightening architectural lines takes your mobile photography to the next level. This technique guarantees that buildings, bridges, and other structures appear as they do in real life, with straight, parallel lines.
It's particularly vital when capturing iconic architecture or creating professional-looking real estate photos.
To straighten architectural lines in your mobile photos, you'll need to use your editing app's perspective or skew tools. These allow you to adjust the image's horizontal and vertical planes independently.
Start by identifying the main architectural elements in your photo, such as walls, windows, or columns. Then, use the perspective tool to align these elements with the image's grid or horizon line.
Here are three key benefits of straightening architectural lines:
- Improved visual balance and symmetry
- Enhanced perception of scale and proportion
- More professional and polished final image
Balancing Elements in Post-Processing
Mastering the art of balancing elements in post-processing can elevate your mobile photos from good to great. When editing your RAW mobile photos, focus on creating harmonious compositions by adjusting the visual weight of different elements.
Start by identifying the main subject and secondary elements in your image. Use cropping tools to reframe the shot, placing the subject according to the rule of thirds or golden ratio. Adjust exposure and contrast to emphasize or de-emphasize certain areas, guiding the viewer's eye through the frame.
Color balance plays an essential role in harmonizing your image. Use selective color adjustments to create cohesion or contrast between elements. Don't shy away from reducing saturation in distracting areas to draw attention to your main subject.
Experiment with vignetting to subtly direct focus towards the center of your image. Use gradient filters to balance bright skies with darker foregrounds in landscape shots.
For portraits, consider using radial filters to soften the background while keeping your subject sharp.
Fine-Tuning Color and Contrast
Fine-tuning color and contrast is essential for creating visually striking mobile photos that captivate your audience. When editing RAW files on your mobile device, you'll have greater control over these elements, allowing you to enhance your images with precision.
Start by adjusting the white balance to guarantee accurate colors throughout your photo. You can use presets or manually tweak the temperature and tint sliders to achieve the desired look.
Next, focus on enhancing the overall contrast. Adjust the highlights and shadows to bring out details in both bright and dark areas of your image.
To further refine your photo's appearance, consider these three key adjustments:
- Vibrance: Boost the intensity of muted colors without oversaturating already vibrant hues.
- Clarity: Enhance mid-tone contrast to add depth and texture to your image.
- Dehaze: Reduce atmospheric haze or add a subtle ethereal effect.
Don't be afraid to experiment with color grading tools to create a unique mood or style. Use split-toning to add different colors to the highlights and shadows, or apply a subtle color overlay to unify your image's palette.
Frequently Asked Questions
Which Mobile Apps Are Best for Editing RAW Photos?
You'll find several excellent apps for editing RAW photos on mobile. Top choices include Lightroom Mobile, Snapseed, VSCO, and Darkroom. These apps offer powerful tools for adjusting exposure, color, and detail in your RAW files.
How Can I Recover Details in Overexposed or Underexposed Areas?
To recover details in overexposed areas, you'll want to reduce highlights and whites. For underexposed regions, boost shadows and blacks. Use the adjustment sliders in your editing app to fine-tune these settings and reveal hidden details.
What's the Ideal Resolution for Sharing Edited RAW Photos Online?
For sharing edited RAW photos online, you'll want to contemplate your platform. Generally, a resolution of 2048 pixels on the long edge works well for most social media sites, balancing quality and file size efficiently.
How Do I Maintain Image Quality When Exporting Edited RAW Files?
To maintain image quality when exporting edited RAW files, you'll want to use high-quality settings. Choose lossless formats like TIFF or PNG, or use minimal compression with JPEGs. Don't downscale unless necessary, and always save a master copy.
Can I Apply Presets to RAW Mobile Photos for Quick Editing?
Yes, you can apply presets to RAW mobile photos for quick editing. Many mobile editing apps offer preset options. You'll save time and achieve consistent looks across your images by using presets as a starting point for your edits.
In Summary
You've now got the tools to transform your raw mobile photos into stunning compositions. Remember, it's all about balance, alignment, and thoughtful cropping. Don't be afraid to experiment with perspective and fine-tune your color and contrast. As you practice these techniques, you'll develop an eye for what works best. Keep shooting, keep editing, and watch your mobile photography skills soar. With these tips, you're well on your way to creating mesmerizing images right from your pocket.

Leave a Reply