
To capture stunning starry night photos with your smartphone, you'll need the right mobile lens attachment and accessories. Choose a wide-angle lens with a large aperture for better light capture. Use a sturdy tripod to prevent camera shake during long exposures. Set your phone to manual mode, adjusting ISO, shutter speed, and focus for best results. Find a dark location away from light pollution and include interesting foreground elements in your composition. Don't forget essential apps like NightCap Camera for advanced controls and Star Walk 2 for planning. With these secrets, you're on your way to creating breathtaking astrophotography – but there's even more to explore in the world of mobile stargazing.
Understanding Mobile Lens Attachments

While smartphone cameras have improved considerably in recent years, mobile lens attachments can take your starry night photography to the next level. These accessories clip onto your phone's camera, enhancing its capabilities and allowing you to capture stunning celestial images.
The most common types of lens attachments for astrophotography are wide-angle and telephoto lenses. Wide-angle lenses broaden your field of view, enabling you to capture more of the night sky in a single frame. They're ideal for capturing the Milky Way or expansive starscapes.
Telephoto lenses, on the other hand, zoom in on distant objects, making them perfect for photographing the moon or specific constellations.
When choosing a lens attachment, consider factors like compatibility with your phone model, optical quality, and ease of use. Look for lenses made with high-quality glass to minimize distortion and maximize light transmission. Some attachments come with multiple lenses in one package, offering versatility for different shooting scenarios.
To get the best results, verify your lens attachment is securely fastened and clean before use. Experiment with different exposure settings and compositions to find what works best for your specific setup and subject matter.
Choosing the Right Clip-On Lens
Selecting the right clip-on lens for your smartphone can greatly impact the quality of your starry night photographs. When choosing a clip-on lens, consider the focal length and aperture. For astrophotography, you'll want a wide-angle lens with a focal length between 14mm and 24mm to capture more of the night sky.
Look for lenses with wide apertures (f/2.8 or wider) to allow more light into the sensor.
Material quality is essential. Opt for lenses made from high-quality glass rather than plastic to guarantee better image clarity and reduce distortion. Multi-coated lenses will help minimize glare and ghosting, which can be particularly troublesome when photographing bright stars.
Check the compatibility of the clip-on lens with your specific smartphone model. Some lenses are designed for particular phone brands or models, while others are universal. Universal clips may offer more flexibility but mightn't provide as secure a fit.
Consider investing in a lens kit that includes multiple options, such as a wide-angle, fisheye, and macro lens. This versatility will allow you to experiment with different compositions and styles in your starry night photography.
Essential Accessories for Astrophotography

Success in astrophotography often hinges on having the right tools at your disposal. Beyond your smartphone and clip-on lens, several accessories can greatly enhance your starry night photography.
A sturdy tripod is vital for keeping your phone steady during long exposures, eliminating camera shake and ensuring sharp images. Pair it with a smartphone mount for secure attachment.
To capture the faintest stars, you'll need a remote shutter release or timer app to minimize vibrations when triggering the camera. A red light headlamp is essential for preserving your night vision while adjusting settings or moving equipment.
Don't forget extra batteries or a portable charger, as long exposures and cold temperatures can quickly drain your phone.
For more advanced shots, consider a star tracker mount to compensate for Earth's rotation during extended exposures. A light pollution filter can help reduce urban glow, revealing more stars in your images.
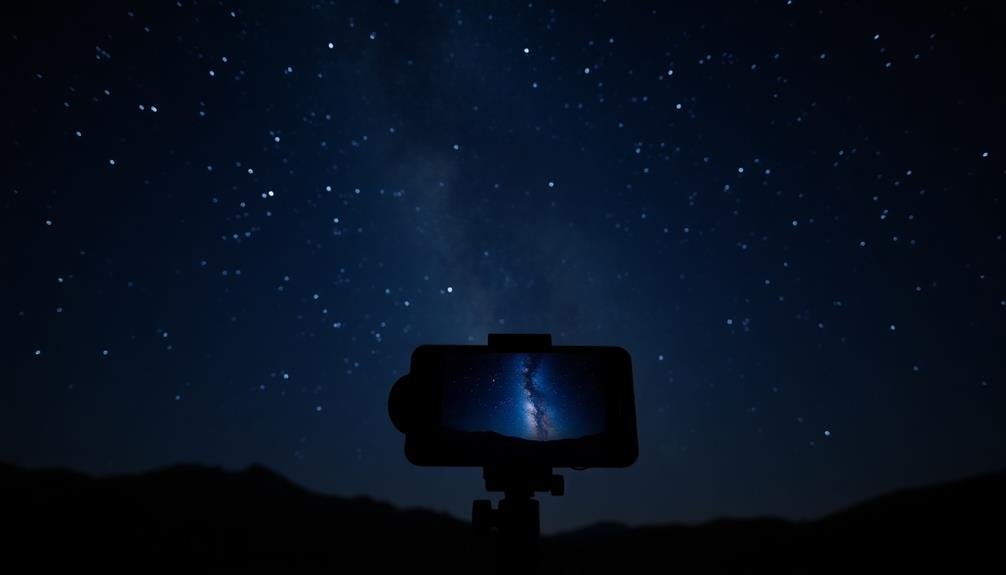
Setting Up Your Smartphone

Once you've gathered your essential accessories, it's time to set up your smartphone for astrophotography.
Begin by attaching your mobile lens to your phone's camera. Verify it's securely fastened to avoid any movement during long exposures. Next, mount your phone on the tripod using the smartphone adapter. Position it facing the night sky, making sure it's level and stable.
Open your camera app and switch to manual or pro mode. Adjust your ISO to a higher setting, typically between 800 and 3200, depending on your phone's capabilities. Set your shutter speed to at least 15 seconds, or use the bulb mode if available.
If your phone allows, adjust the focus to infinity or use manual focus to sharpen distant stars. Enable your phone's timer or use a remote shutter release to minimize camera shake. Turn off your flash and any automatic settings that might interfere with your long exposure.
If your phone has RAW capture, enable it for better post-processing flexibility. Finally, frame your shot, including interesting foreground elements if possible. Take a test shot, review it, and make any necessary adjustments before capturing your final image.
Finding the Perfect Location

The perfect location can make or break your starry night photograph. To find an ideal spot, you'll need to take into account several factors. First, seek areas with minimal light pollution. Cities and towns emit artificial light that washes out the night sky, so venture into rural or remote locations for the best results.
Look for open spaces with unobstructed views of the horizon. Fields, beaches, or hilltops work well. Think about incorporating interesting foreground elements like trees, rock formations, or buildings to add depth to your composition.
Check the weather forecast before heading out. Clear, cloudless nights are vital for capturing crisp star images. Avoid nights with high humidity or haze, as these conditions can blur your shots.
Timing is essential. Plan your shoot around the lunar cycle; a new moon or crescent moon phase provides the darkest skies. Also, research the Milky Way's position and visibility in your area using astronomy apps or websites.
Lastly, make sure you have permission to access your chosen location at night. Some parks or private properties may have restrictions. Always prioritize your safety and respect local regulations when photographing in remote areas.
Adjusting Camera Settings

With your perfect location secured, it's time to focus on your camera settings. When using a mobile lens attachment for starry night photography, you'll need to manually adjust your phone's camera settings. Start by setting your ISO to a higher value, typically between 1600 and 3200, to increase light sensitivity. Next, adjust your shutter speed to a longer exposure, around 15-30 seconds, to capture more light from the stars.
For your aperture, set it to the widest possible opening (lowest f-number) to allow maximum light intake. Most mobile lens attachments have a fixed aperture, so you'll work with what you have. Use manual focus and set it to infinity to guarantee sharp stars. Enable your phone's night mode or long exposure feature if available.
Here's a quick reference table for your settings:
| Setting | Recommended Value | Purpose |
|---|---|---|
| ISO | 1600-3200 | Increase light sensitivity |
| Shutter Speed | 15-30 seconds | Capture more starlight |
| Aperture | Widest available | Maximize light intake |
Remember to use a tripod or stable surface to avoid camera shake during long exposures. Experiment with these settings to find the perfect balance for your specific lens attachment and lighting conditions.
Focusing on Celestial Objects

When capturing celestial objects, you'll need to master manual focus techniques to achieve sharp, crisp images.
Start by switching your lens to manual focus mode and slowly adjusting the focus ring until stars appear as pinpoint lights.
For best results, fine-tune your infinity focus setting, as the exact position can vary slightly between lenses and may not align precisely with the lens's infinity mark.
Manual Focus Techniques
Mastering manual focus techniques is essential for capturing sharp, detailed images of celestial objects. When using a mobile lens attachment for astrophotography, you'll need to rely on manual focus to achieve the best results.
Start by setting your camera app to manual focus mode and disabling any automatic focus features.
To achieve precise focus on stars or other celestial bodies:
- Use the brightest star or planet in the frame as your focal point.
- Zoom in digitally on your phone's screen to see the star more clearly.
- Slowly adjust the focus ring on your lens attachment until the star appears as a sharp, pinpoint of light.
Remember that even slight movements can affect focus, so use a steady tripod and avoid touching your phone during this process.
If your lens attachment doesn't have a focus ring, you may need to adjust the distance between the lens and your phone's camera.
Once you've achieved sharp focus, take a test shot and review it at full size on your phone's screen.
Look for crisp star points and well-defined celestial objects. If necessary, make fine adjustments and repeat the process until you're satisfied with the result.
Infinity Focus Optimization
Infinity focus optimization takes your manual focusing skills to the next level when capturing celestial objects. When using a mobile lens attachment for astrophotography, you'll need to fine-tune your focus to achieve the sharpest possible images of stars and planets.
Start by setting your camera app to manual focus mode. Then, locate a bright star or planet in the night sky. Zoom in on this celestial object as much as possible using your phone's digital zoom.
Now, slowly adjust the focus ring on your lens attachment until the star appears as a tiny, crisp point of light.
To further refine your focus, use the live view on your screen and zoom in digitally to check the sharpness. If you're struggling to find the perfect focus, try using the "focus peaking" feature if your camera app supports it. This highlights areas of high contrast, making it easier to identify when stars are in focus.
Remember that temperature changes can affect your lens, so periodically check and readjust your focus throughout your shooting session.
With practice, you'll master infinity focus optimization and capture stunning starry night photos.
Capturing Long Exposure Shots

Long exposure shots are the key to capturing stunning starry night images. With your mobile lens attachment, you'll need to stabilize your phone and adjust your camera settings to allow more light into the sensor over an extended period. Use a sturdy tripod or a flat surface to keep your device perfectly still during the exposure.
Set your camera app to manual mode and adjust the ISO, shutter speed, and aperture. Start with a high ISO (around 1600-3200), a wide aperture (the lowest f-number your lens allows), and a shutter speed between 15-30 seconds. Experiment with these settings to find the right balance for your specific location and lighting conditions.
To create enchanting starry night photos, consider incorporating these elements:
- A foreground subject (e.g., a tree, rock formation, or building) to add depth and scale
- Star trails by extending your exposure time to several minutes or more
- The Milky Way as a dramatic backdrop, visible during certain times of the year
Remember to use your phone's timer or a remote shutter release to prevent camera shake when initiating the exposure.
With practice and patience, you'll soon be capturing breathtaking starry night images using your mobile lens attachment.
Post-Processing Starry Night Photos

After capturing your starry night shots, post-processing can elevate your images to the next level. Begin by importing your RAW files into editing software like Adobe Lightroom or Capture One. Adjust the white balance to enhance the night sky's natural colors, then fine-tune exposure, highlights, and shadows to bring out details in both the stars and landscape.
Noise reduction is essential for night photography, so apply it carefully to maintain sharpness while reducing graininess. Increase contrast and clarity to make stars pop, but be cautious not to overdo it. Use the dehaze tool to cut through atmospheric haze and reveal more stars.
| Adjustment | Purpose | Recommended Range |
|---|---|---|
| White Balance | Color correction | 3000K – 4000K |
| Exposure | Overall brightness | +0.5 to +1.5 |
| Noise Reduction | Reduce graininess | 20-40 |
Common Mistakes to Avoid

When venturing into starry night photography, you'll want to steer clear of several common pitfalls that can compromise your shots. One frequent mistake is underestimating the significance of a stable setup. Even the slightest camera shake can blur your stars, so invest in a sturdy tripod and use your phone's timer or a remote shutter release.
Another error is neglecting to focus properly. Autofocus often struggles in low light, so switch to manual focus and set it to infinity. You can fine-tune this by using your phone's live view to zoom in on a bright star and adjust until it's sharp.
Don't forget about light pollution. It's essential to find a dark location away from city lights. Even moonlight can wash out the stars, so plan your shoot around the moon phases.
Lastly, avoid these composition mistakes:
- Failing to include interesting foreground elements
- Centering the Milky Way instead of using the rule of thirds
- Not accounting for star movement during long exposures
Recommended Apps for Astrophotography

With the right tools, you can take your starry night photography to the next level. Several mobile apps can enhance your astrophotography experience and help you capture stunning images of the night sky.
NightCap Camera is a popular choice, offering manual controls and long exposure capabilities specifically designed for low-light conditions. It's user-friendly and allows you to adjust ISO, shutter speed, and focus with ease.
For planning your shoots, Star Walk 2 and Stellarium Mobile are excellent options. These apps provide detailed star maps, planet locations, and celestial event information, helping you prepare for the perfect shot.
PhotoPills is another versatile app that offers a night augmented reality mode, allowing you to visualize the Milky Way's position in real-time.
If you're looking to edit your starry night photos, Snapseed and Lightroom Mobile are powerful yet intuitive options. They offer advanced editing tools like selective adjustments, noise reduction, and sharpening, which are essential for enhancing astrophotography images.
For those interested in stacking multiple exposures, Deep Sky Camera is an app worth exploring, as it can greatly improve the signal-to-noise ratio in your final image.
Frequently Asked Questions
Can I Use Mobile Lens Attachments for Daytime Photography as Well?
Yes, you can definitely use mobile lens attachments for daytime photography. They're versatile tools that enhance your phone's camera capabilities in any lighting condition. You'll find them useful for macro shots, wide-angle views, and even portrait photography during daylight hours.
How Do I Clean and Maintain My Smartphone Lens Attachments?
To clean and maintain your smartphone lens attachments, you'll want to use a microfiber cloth for regular dusting. For deeper cleaning, use a lens cleaning solution. Store them in a protective case when not in use to prevent scratches.
Are There Any Safety Concerns When Doing Astrophotography in Remote Locations?
When doing astrophotography in remote locations, you'll need to prioritize safety. Be aware of your surroundings, bring a buddy, pack essential supplies, and let someone know your plans. Watch for wildlife and dress for changing weather conditions.
Can I Stack Multiple Lens Attachments for Better Results?
You can stack multiple lens attachments, but it's not always recommended. You'll risk image quality degradation and vignetting. Instead, choose one high-quality lens attachment that suits your needs for better results in your photography.
How Do Atmospheric Conditions Affect Mobile Astrophotography Image Quality?
Atmospheric conditions greatly impact your mobile astrophotography. Clear, dry nights yield the best results. You'll face challenges with humidity, light pollution, and air turbulence. They can cause blurry images, reduced contrast, and unwanted glare in your shots.
In Summary
You've now got the tools to capture stunning starry night photos with your smartphone. Remember to choose the right lens, find a dark location, and use long exposures. Don't forget to experiment with post-processing to enhance your images. With practice, you'll master mobile astrophotography and create breathtaking shots of the night sky. Keep exploring new techniques, and you'll soon be sharing your stellar captures with the world. Happy shooting!


Leave a Reply