
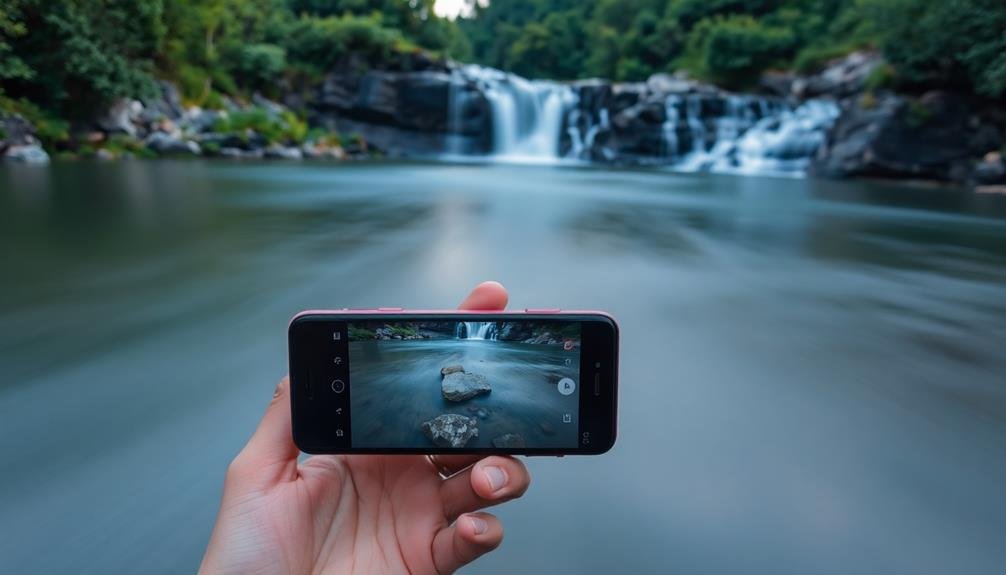
To achieve silky water effects in mobile photography, you'll need to master seven key techniques. Start with long exposure mode and slow shutter speed settings in your camera app. Use neutral density filters to reduce light intake, allowing for longer exposures. Stabilize your phone with a tripod or improvised surface for crisp shots. Try motion blur apps for digital alternatives to physical filters. In post-processing, apply selective smoothing and motion tools to enhance the dreamy water look. Finally, tackle low light challenges with specific capture and editing methods. These techniques will transform your ordinary water shots into enchanting, ethereal landscapes.
Long Exposure Mode
Although many smartphones now offer a dedicated Long Exposure mode, it's not always obvious how to use it effectively. To capture silky water images, start by locating this feature in your camera app. It's often found under "Pro" or "Manual" settings.
Once you've accessed Long Exposure mode, set your phone on a stable surface or use a tripod to prevent camera shake. Choose a shutter speed between 1/2 and 4 seconds for flowing streams, or up to 30 seconds for larger bodies of water. The longer the exposure, the smoother the water will appear.
Adjust your ISO to the lowest possible setting to reduce noise, typically 50 or 100. If your image is too bright, use the exposure compensation feature to darken it slightly. Focus on a stationary object near the water to guarantee sharpness.
For best results, shoot during golden hour or on overcast days to avoid overexposure. If it's too bright, consider using a neutral density filter to reduce light entering the lens.
Experiment with different compositions and shutter speeds to find the perfect balance between silky water and surrounding detail.
Neutral Density Filters

A photographer's secret weapon, neutral density (ND) filters can transform your mobile water photography. These thin, dark filters attach to your phone's lens, reducing the amount of light that enters the camera. This allows you to use slower shutter speeds in bright conditions, creating that coveted silky water effect.
ND filters come in various strengths, measured in stops. For water photography, you'll want to start with a 3-stop or 6-stop filter. These will let you extend your exposure time considerably, even in daylight.
To use an ND filter, first attach it to your phone using a clip-on adapter. Then, adjust your camera settings manually or use a long exposure app to compensate for the reduced light.
When shooting with an ND filter, use a tripod or stable surface to keep your phone steady during the extended exposure. Experiment with different shutter speeds to achieve your desired effect.
Motion Blur Apps

In addition to physical filters, motion blur apps offer a digital alternative for creating silky water effects. These apps use software algorithms to simulate long exposure photography, allowing you to achieve smooth, flowing water in your mobile shots without specialized equipment.
Popular motion blur apps include Slow Shutter Cam, Average Camera Pro, and Spectre Camera. They work by capturing multiple frames and blending them together, creating the illusion of movement over time.
To use these apps effectively, you'll need to keep your phone steady or use a tripod for best results.
When using motion blur apps, experiment with different settings to find the right balance. Adjust the exposure time, blur strength, and sensitivity to achieve your desired effect. Some apps also offer mask tools, allowing you to selectively apply the blur to specific areas of your image.
While these apps can produce impressive results, they may not always match the quality of traditional long exposure techniques. However, they're excellent tools for capturing silky water effects when you don't have access to physical filters or when shooting conditions are challenging.
Slow Shutter Speed Settings

While motion blur apps offer a digital solution, mastering your phone's native camera settings can yield impressive silky water effects. Most modern smartphones allow you to adjust shutter speed manually. Look for "Pro" or "Manual" mode in your camera app to access these controls.
To achieve silky water, you'll want to use slower shutter speeds. Start with 1/4 second and experiment up to several seconds, depending on the water's motion and available light. Remember, longer exposures require more stability, so a tripod or steady surface is essential.
Here's a quick guide to shutter speeds and their effects on water:
| Shutter Speed | Water Effect | Best For |
|---|---|---|
| 1/4 – 1/2 sec | Slight blur | Rapids |
| 1 – 2 sec | Smooth flow | Rivers |
| 3 – 5 sec | Misty look | Waterfalls |
As you slow down the shutter, you'll need to compensate by adjusting other settings. Reduce your ISO to its lowest value and narrow the aperture (higher f-number) to prevent overexposure. If your phone has a built-in ND filter, use it to allow for even longer exposures in bright conditions.
Tripod Stabilization Techniques

To achieve silky water effects in mobile photography, you'll need to keep your device steady during long exposures.
Consider investing in a portable tripod designed for smartphones, which can be easily carried and set up on various terrains.
If you don't have a tripod, you can improvise by using stable surfaces like rocks, ledges, or even your bag to prop up your phone and minimize camera shake.
Portable Tripod Options
Portable tripods are essential for capturing silky water effects in mobile photography. You'll find various options designed specifically for smartphones, offering stability and versatility in compact packages.
Consider a mini tabletop tripod with flexible legs, which you can wrap around railings or tree branches for unique angles. These lightweight options easily fit in your pocket and adapt to uneven surfaces.
For more height, look into collapsible travel tripods that extend to eye level but fold down small enough to fit in a backpack.
Don't overlook smartphone-specific mounts that attach to standard tripods. These clamps securely hold your device and often feature adjustable ball heads for precise framing. Some even include built-in remote shutter controls for hands-free shooting.
For ultra-portability, investigate magnetic mounts that stick to metal surfaces or clip-on lenses with integrated mini tripods. These options work well for impromptu shots when you don't want to carry extra gear.
When choosing a portable tripod, prioritize stability, weight, and ease of use. Verify it's compatible with your smartphone model and case.
Improvising Stable Surfaces
Ingenuity often trumps gear when it comes to stabilizing your smartphone for silky water shots. When you don't have a tripod handy, look for existing surfaces to steady your device. Flat rocks, ledges, or fence posts can serve as makeshift platforms. Place your phone on these surfaces and use small objects like pebbles or folded paper to adjust the angle.
You can also create a DIY support using everyday items. A bag of rice or beans makes an excellent moldable base. Simply shape it to cradle your phone at the desired angle. Alternatively, use a water bottle as a cylindrical stand by leaning your phone against it.
For added stability, try the string method. Tie a length of string to a small weight, like a washer or bolt. Step on the other end and pull the string taut, creating a vertical stabilizer for your phone. This technique works well for chest-level shots.
Don't overlook your car as a stable platform. Rest your phone on the hood, roof, or side mirror for a variety of angles. Just be sure to park safely away from traffic.
Post-Processing Smoothing Effects

When you can't achieve the perfect silky water effect during shooting, post-processing tools can come to your rescue.
You'll find blur and motion tools in most mobile editing apps that can simulate long exposure effects on your water images.
For more precise control, try selective smoothing techniques to target specific areas of your photo, enhancing the dreamy water look while keeping other elements sharp.
Blur and Motion Tools
Post-processing tools offer powerful options for creating silky water effects when you couldn't achieve them in-camera. Blur and motion tools in mobile editing apps can transform ordinary water shots into dreamy, smooth landscapes. You'll find these features in popular apps like Snapseed, Lightroom Mobile, and VSCO.
Start by selecting the area of water you want to smooth. Use masking tools to isolate the water from the rest of the image. Then, apply a directional blur or motion blur effect to create the illusion of movement. Adjust the intensity and direction of the blur to match the natural flow of the water.
For more advanced techniques, try:
- Layering multiple blurred versions of the image with varying opacities
- Using radial blur tools to create swirling effects in circular water features
- Combining blur effects with subtle color adjustments to enhance the ethereal quality
Remember to keep the rest of the image sharp to maintain contrast with the silky water.
Experiment with different blur strengths and directions to find the most natural-looking result. Don't overdo it – subtle effects often look more realistic than extreme blurring.
With practice, you'll master the art of creating stunning silky water effects in your mobile photos.
Long Exposure Simulation
While blur and motion tools offer quick solutions, long exposure simulation takes silky water effects to the next level. This technique mimics the smooth, dreamy look of long-exposure shots traditionally achieved with DSLR cameras. You'll need a photo editing app with advanced features to pull this off effectively.
Start by selecting a sharp, well-exposed image of moving water. Then, use your app's layering function to create multiple copies of the image. Apply a slight motion blur to each layer, varying the direction and intensity. Blend these layers together, adjusting opacity to create a natural flow effect.
Here's a quick guide to the process:
| Step | Action | Result |
|---|---|---|
| 1 | Duplicate image | Multiple layers |
| 2 | Apply motion blur | Directional smoothing |
| 3 | Adjust blur settings | Varied flow patterns |
| 4 | Blend layers | Seamless integration |
| 5 | Fine-tune opacity | Natural appearance |
Remember to mask out any static elements in your image to maintain their sharpness. This technique requires practice, but you'll soon be creating stunning silky water effects that rival those captured with professional gear.
Selective Smoothing Techniques
Selective smoothing techniques offer a powerful way to enhance your silky water effects in mobile photography.
These post-processing methods allow you to target specific areas of your image, creating a seamless blend between the smooth water and sharp surroundings. By using masking tools in editing apps, you'll be able to isolate the water and apply smoothing effects without affecting other elements in your composition.
To achieve the best results with selective smoothing, follow these steps:
- Identify the water areas in your image and create a precise mask.
- Apply a blur or smoothing filter to the masked area.
- Adjust the intensity and direction of the smoothing effect to match the natural flow of water.
Remember to maintain a balance between smoothness and detail. Overusing these techniques can result in an artificial look, so it's essential to preserve some texture in the water.
Experiment with different opacity levels and blending modes to fine-tune your effect. By mastering selective smoothing techniques, you'll be able to create stunning silky water images even when shooting conditions aren't ideal for long exposures.
This approach gives you more control over the final result and allows for creative expression in your mobile photography.
Low Light Capture Methods

When capturing silky water effects in low light conditions, mobile photographers face unique challenges. You'll need to adapt your techniques to compensate for the limited light and your phone's smaller sensor.
Start by using a tripod or stabilizing your device to guarantee sharp images during longer exposures. Enable your phone's night mode or pro mode for manual control over settings.
Lower your ISO to minimize noise, typically between 100-400. Set a slower shutter speed, anywhere from 1/4 second to several seconds, depending on the water's movement and available light. Use your phone's built-in timer or a remote shutter release to avoid camera shake.
Experiment with exposure bracketing, taking multiple shots at different settings to find the best result. Consider using a neutral density filter to further lengthen exposure times, even in twilight conditions.
Focus on contrasting elements in the scene, like rocks or shorelines, to enhance the silky water effect.
Post-processing can help refine your low-light silky water shots. Use your phone's editing tools or third-party apps to adjust exposure, reduce noise, and enhance details in shadow areas.
With practice, you'll master creating stunning silky water images in challenging low-light situations.
Frequently Asked Questions
Can Silky Water Effects Be Achieved Without Specialized Equipment?
Yes, you can achieve silky water effects without specialized equipment. You'll need to use long exposure techniques, which can be done with your smartphone's manual camera mode or third-party apps. Steady hands or improvised support are essential.
How Do Weather Conditions Affect Silky Water Photography?
Weather plays an essential role in your silky water shots. You'll find overcast days ideal, as they reduce glare. Wind can create ripples, affecting smoothness. Rain adds drama but challenges your setup. Time of day also impacts lighting conditions.
What Are the Best Times of Day for Capturing Silky Water?
For the best silky water shots, you'll want to aim for early morning or late afternoon. These golden hours offer softer light and longer shadows. Overcast days can also work well, providing even lighting throughout the day.
Are There Specific Locations That Work Better for Silky Water Shots?
You'll find great silky water shots at waterfalls, streams, and coastal areas. Look for locations with moving water and natural or artificial obstacles. Rivers with rocks, beaches with piers, or fountains in urban settings work well too.
How Can I Protect My Phone While Shooting Near Water?
You'll want to protect your phone near water. Use a waterproof case or bag, keep it away from splashes, and avoid setting it down on wet surfaces. Don't forget to secure it with a lanyard or wrist strap.
In Summary
You've now got the tools to create stunning silky water shots with your mobile phone. Remember, practice makes perfect. Don't be afraid to experiment with different techniques and combine methods for unique results. Whether you're using built-in features, add-on accessories, or post-processing tricks, you'll soon be capturing dreamy waterscapes like a pro. So grab your phone, head to the nearest water source, and start creating those mesmerizing, fluid images you've always admired.


Leave a Reply