
Phone camera light trail secrets involve mastering long-exposure techniques to capture stunning nighttime scenes. You'll need a smartphone with manual controls or a dedicated app, a sturdy tripod, and a remote shutter release. Choose locations with consistent traffic flow and interesting backgrounds. Set your camera to manual mode, use a low ISO, small aperture, and long shutter speed. Experiment with composition, incorporating leading lines and foreground elements. Focus manually for sharper images, and try light painting for creative effects. Post-processing can enhance contrast and reduce noise. Avoid common pitfalls like camera shake and incorrect exposure settings. Discovering these secrets opens up a world of mesmerizing photographic possibilities.
Understanding Light Trails

Light trails are enchanting streaks of illumination that appear in long-exposure photographs taken at night or in low-light conditions. They're created when your camera's shutter remains open for an extended period, capturing the movement of light sources.
You'll often see these mesmerizing trails in cityscapes, where car headlights and taillights paint vibrant paths through the image.
To understand light trails, you need to grasp the concept of long exposure photography. Your phone's camera sensor continuously collects light during the exposure time, resulting in a single image that shows motion over time. The brighter the light source and the longer it's in the frame, the more pronounced the trail will be.
You can create light trails with various moving light sources, not just vehicles. Try experimenting with sparklers, glow sticks, or even the moon's movement across the sky.
The key is to keep your camera steady and choose an appropriate shutter speed to capture the desired effect. With practice, you'll learn to control the intensity and length of the trails, allowing you to craft stunning nighttime images with your phone camera.
Essential Equipment for Light Trails

Equipped with the right tools, you'll be ready to capture stunning light trails with your phone camera. First, you'll need a smartphone with manual camera controls or a dedicated camera app that allows long exposure settings. Look for apps like Slow Shutter Cam or ProCam that offer these features.
A sturdy tripod is essential to keep your phone steady during long exposures. Invest in a compact, lightweight tripod with flexible legs for versatile positioning. Don't forget a smartphone adapter to securely attach your device to the tripod.
To minimize camera shake, consider using a remote shutter release or your phone's self-timer function. This prevents any movement caused by tapping the screen to take a photo.
For added creativity, pack some small LED lights or glow sticks. These can be used to "paint" with light in your compositions. A headlamp or flashlight is also useful for maneuvering in low-light conditions and illuminating foreground elements.
Lastly, bring extra battery packs or a portable charger. Long exposure photography can quickly drain your phone's battery, especially in colder weather.
Choosing the Perfect Location
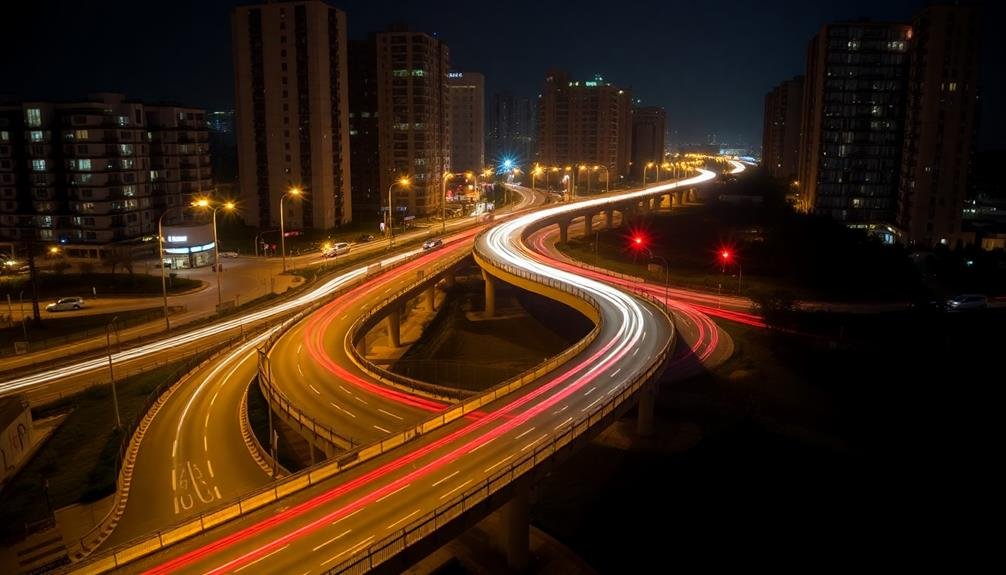
When scouting for the ideal light trail location, consider areas with consistent traffic flow and interesting background elements. Busy urban intersections, highways, or bridges often provide excellent opportunities for capturing light trails.
Look for elevated vantage points that offer a clear view of the road below, allowing you to capture longer trails without obstruction.
Don't limit yourself to just car lights. Ferris wheels, carousels, and other moving attractions can create unique circular light patterns. Waterfront locations with boat traffic can also yield interesting results.
Pay attention to the surroundings and how they'll complement your light trails. Cityscape backgrounds can add depth and context to your images.
Safety should be your top priority. Guarantee you're in a secure location where you won't be disturbed or put yourself at risk.
Scout during daylight hours to familiarize yourself with the area and plan your shot. Consider factors like pedestrian traffic, parking availability, and any potential restrictions on photography.
Lastly, be mindful of the weather. While clear nights are ideal, foggy or misty conditions can create atmospheric effects that enhance your light trail photos.
Camera Settings for Light Trails

To capture stunning light trails, mastering your camera settings is essential. Start by switching your phone's camera to manual or pro mode. Set your ISO to the lowest possible value, typically 50 or 100, to reduce noise in your images.
Choose a small aperture (high f-number) like f/8 or f/11 to guarantee a wide depth of field and sharp focus throughout the scene.
Next, adjust your shutter speed. For light trails, you'll want a long exposure, anywhere from 1 to 30 seconds depending on the speed of the moving lights. Experiment with different durations to achieve your desired effect. Use your phone's built-in timer or a remote shutter release to avoid camera shake when pressing the shutter button.
Enable your camera's long exposure noise reduction feature if available. This will help minimize digital noise in your final image. Set your white balance to "daylight" or "tungsten" depending on the predominant light source in your scene.
Composition Techniques for Impact

To create striking light trail images, you'll want to master a few key composition techniques.
Frame your shot with interesting foreground elements to add depth and context to your light trails.
Use leading lines and the natural flow of traffic to guide the viewer's eye through your image, and carefully balance areas of light and dark for maximum visual impact.
Frame With Foreground Elements
Three key composition techniques can elevate your light trail photography, with framing using foreground elements being one of the most impactful. By incorporating objects in the foreground, you'll add depth and context to your light trail shots, making them more visually interesting and engaging.
Look for structures like bridges, archways, or tree branches that can create a natural frame around your light trails. These elements guide the viewer's eye towards the main subject while providing a sense of scale and location. Urban environments offer plenty of opportunities: use building corners, street signs, or lampposts to frame your composition creatively.
When selecting foreground elements, consider their silhouette and how they'll contrast with the bright light trails. Dark, solid shapes often work best, creating a striking juxtaposition against the luminous streaks. Experiment with different angles and positions to find the most effective framing.
Remember to adjust your exposure settings to capture both the foreground elements and light trails clearly. You might need to use a slightly higher ISO or longer exposure time to guarantee the foreground isn't completely silhouetted, preserving some detail in these framing elements.
Use Leading Lines
Leading lines are a powerful composition technique that can dramatically enhance your light trail photography. When shooting light trails with your phone camera, look for natural or man-made lines that guide the viewer's eye through the image. These lines can be roads, sidewalks, bridges, or even rows of streetlights.
To use leading lines effectively, position yourself so that the lines converge toward your main subject or the vanishing point. This creates depth and draws the viewer into the scene. For light trails, try aligning your shot so that the trails follow these lines. You'll often find that highways and city streets naturally create leading lines for vehicle light trails.
Don't limit yourself to straight lines; curved roads or winding paths can add a dynamic element to your composition. Experiment with different angles and perspectives to find the most impactful arrangement of lines.
Balance Light and Dark
Balancing light and dark elements in your phone camera light trail photography is essential for creating impactful compositions. When capturing light trails, you'll often encounter scenes with extreme contrast between bright moving lights and dark backgrounds.
To achieve a visually appealing balance, consider the following techniques:
First, expose for the highlights. Set your camera's exposure to properly capture the bright light trails without overexposing them. This may result in a darker overall image, but it'll preserve the details in the trails.
Next, look for areas of interest in the darker parts of the scene. Include silhouettes of buildings, trees, or other static elements to add depth and context to your composition.
Use the Rule of Thirds to place your light trails strategically within the frame. Position them along the grid lines or at intersecting points to create a sense of balance and visual interest.
Don't be afraid to incorporate negative space in your composition. The dark areas can provide a striking contrast to the vibrant light trails, enhancing their impact.
Experiment with different angles and perspectives to find the perfect balance between light and dark elements. Sometimes, slightly adjusting your position can dramatically improve the overall composition and create a more harmonious image.
Mastering Manual Focus

You'll elevate your light trail photography by mastering manual focus techniques on your phone camera.
Start by utilizing focus peaking features, which highlight sharp edges in your frame, ensuring crisp details in your shots.
For moving subjects, pre-focus on the expected path of motion, and experiment with hyperfocal distance to maximize depth of field in your light trail compositions.
Focus Peaking Techniques
When it comes to capturing stunning light trails, mastering manual focus is essential. Focus peaking is a powerful technique that can greatly enhance your manual focusing skills. This feature highlights the areas of highest contrast in your frame, making it easier to identify which parts of the image are in sharp focus.
To use focus peaking, first enable it in your phone's camera settings. Once activated, you'll see colored highlights appear on your screen, typically in red, yellow, or white. These highlights indicate the areas of sharpest focus. As you adjust your manual focus, pay attention to where these highlights appear.
For light trail photography, focus on the stationary elements in your scene, such as buildings or street signs. These will serve as anchor points for your composition.
Experiment with different focus points to create varying effects. You might focus on the foreground to emphasize nearby objects, or on the background to highlight distant light sources.
Pre-Focus for Moving Subjects
Pre-focusing on moving subjects is an important skill for capturing dynamic light trails. When you're shooting fast-moving lights, like car trails or fireworks, manual focus is your best friend.
To pre-focus effectively, first identify where your subject will be in the frame. If you're shooting car trails, for example, focus on a spot where the vehicles will pass through.
Use your phone's manual focus feature to lock focus on this predetermined point. Many camera apps allow you to tap and hold on the screen to set focus. Once you've locked focus, don't touch it again. This guarantees your light trails will be sharp and defined.
For more precise control, use focus peaking if your app supports it. This highlights in-focus areas, helping you fine-tune your focus point.
Hyperfocal Distance Utilization
Building on our focus techniques, let's explore the concept of hyperfocal distance. This powerful tool allows you to maximize the depth of field in your light trail photos, ensuring sharpness from the foreground to infinity.
To utilize hyperfocal distance, first calculate it based on your phone camera's focal length and aperture. Many apps can help you with this. Once you know the distance, focus your camera on that point. Everything from half that distance to infinity will appear sharp in your image.
For light trails, set your focus to the hyperfocal distance before the cars start moving. This way, you'll capture crisp trails throughout the frame. Remember, hyperfocal distance changes with different focal lengths and apertures, so recalculate if you adjust these settings.
Practice this technique in various lighting conditions and compositions. You'll find it particularly useful for cityscape light trails, where you want both nearby buildings and distant car trails to be in focus.
Capturing Traffic Light Trails

Traffic light trails offer a stunning way to capture the energy and motion of bustling city streets at night. To create these mesmerizing images with your phone camera, you'll need to find a stable position overlooking a busy road.
Use a tripod or prop your phone against a steady surface to eliminate camera shake. Switch your camera to manual mode or use a long exposure app for more control. Set your ISO low (100-200) to reduce noise and adjust your shutter speed between 2-30 seconds, depending on traffic flow. The longer the exposure, the more light trails you'll capture.
Focus on a stationary object in the scene to guarantee sharpness. As cars pass by, their headlights and taillights will create streaks of light across your image. Experiment with different compositions, including curved roads or intersections for added interest.
For the best results, shoot during blue hour when there's still some ambient light in the sky. This will add depth to your image and prevent the scene from appearing too dark.
Don't forget to clean your lens before shooting to avoid unwanted glare or smudges in your light trails.
Creating Light Painting Effects

You'll need to master long exposure app settings to create stunning light painting effects with your phone.
Experiment with various light sources and techniques, from flashlights to glow sticks, to paint vibrant designs in the air.
Frame your composition carefully, considering the background and foreground elements to complement your light art.
Long Exposure App Settings
Long-exposure apps reveal a world of creative possibilities for light painting on your smartphone. These apps give you control over shutter speed, ISO, and other settings typically found on DSLR cameras. To get started, download a reputable long-exposure app like Slow Shutter Cam or ProCam.
Once you've installed the app, familiarize yourself with its key settings:
- Shutter Speed: Adjust this to control how long your camera's sensor is exposed to light. For light trails, try speeds between 1 and 30 seconds.
- ISO: Keep this low (100-400) to reduce noise in your images.
- Focus: Use manual focus to guarantee your subject remains sharp throughout the exposure.
Experiment with different combinations of these settings to achieve your desired effect. Start with a moderate shutter speed and adjust as needed. If your light trails appear too bright, lower the ISO or decrease the exposure time. Conversely, if they're too dim, increase these values.
Remember to stabilize your phone using a tripod or steady surface to prevent camera shake.
With practice, you'll master these settings and create stunning light trail photographs that rival those taken with professional cameras.
Light Sources and Techniques
With your camera settings dialed in, it's time to explore the heart of light painting: your light sources and techniques. Start by experimenting with various light tools. LED flashlights, glow sticks, fiber optic wands, and even sparklers can create unique effects.
For broader strokes, try LED light panels or electroluminescent wire. Your movement is vital. Practice smooth, deliberate motions to create clean lines and shapes. Quick, jerky movements will result in broken or dotted trails.
Try writing words in the air, drawing geometric shapes, or creating abstract patterns. Remember, you're fundamentally "painting" with light, so be creative.
Distance from the camera affects your light's intensity and focus. Moving closer produces brighter, more defined lines, while stepping back creates softer, more diffused effects. Experiment with different distances for varied results.
Color adds another dimension to your light trails. Use colored gels over white lights or opt for multi-colored LED sources. Combine colors for interesting blends and contrasts.
Don't forget to reflect on your background; a dark setting will make your light trails pop more dramatically.
Composition and Framing Tips
Beyond mastering light sources and techniques, composition and framing play essential roles in creating enchanting light painting effects. When composing your shot, consider the rule of thirds to create visual interest. Place your main light trails along these imaginary lines or at their intersections for a more balanced image.
Experiment with different perspectives to add depth to your light paintings. Try shooting from low angles or elevated positions to create unique viewpoints. Don't forget to include interesting foreground elements to anchor your composition and provide context.
Consider the following tips to enhance your light painting compositions:
- Use leading lines to guide the viewer's eye through the image
- Incorporate symmetry or patterns for a visually striking effect
- Frame your light trails with architectural elements or natural features
Pay attention to negative space in your compositions. This empty area can help emphasize your light trails and create a sense of mystery or drama.
When framing your shot, leave room for movement and guarantee your light trails have enough space to breathe within the frame.
Remember to keep your camera steady throughout the exposure. Use a tripod or stable surface to avoid unwanted camera shake, which can ruin your carefully composed light painting.
Post-Processing Light Trail Photos

Editing software breathes new life into your light trail photos. After capturing stunning light trails, you'll want to enhance them further in post-processing. Start by adjusting exposure and contrast to make the trails pop against the background. Fine-tune highlights and shadows to balance the overall image.
Next, focus on color adjustments. Experiment with white balance to achieve the desired mood, and use selective color adjustments to emphasize specific hues in the light trails. Don't forget to reduce noise, especially in darker areas of the image.
Here's a quick guide to essential post-processing steps:
| Step | Action |
|---|---|
| 1 | Adjust exposure and contrast |
| 2 | Fine-tune highlights and shadows |
| 3 | Correct white balance |
| 4 | Enhance colors selectively |
| 5 | Reduce noise |
Consider using masking techniques to apply adjustments only to specific areas of your photo. This allows you to enhance the light trails without affecting other elements. Finally, experiment with creative effects like adding a subtle glow or vignette to draw attention to the main subject. Remember, post-processing is an art form, so don't be afraid to try different techniques until you achieve your desired result.
Common Light Trail Mistakes

While post-processing can enhance your light trail photos, it's important to address common mistakes during the capture phase. One frequent error is camera shake, which can blur your light trails and ruin the overall image. Always use a stable surface or tripod to keep your phone steady throughout the exposure.
Another mistake is incorrect exposure settings. If your shutter speed is too short, you'll miss out on capturing the full length of light trails. Conversely, if it's too long, you risk overexposing the entire scene. Experiment with different shutter speeds to find the sweet spot for your specific scene.
Many photographers also forget to take into account composition when shooting light trails. Remember to include interesting elements in your frame, such as:
- Stationary objects for contrast
- Leading lines to guide the viewer's eye
- Foreground elements to add depth
Lastly, don't neglect your camera's focus. It's easy to get caught up in capturing the moving lights and forget to verify the rest of your scene is sharp. Use manual focus or tap-to-focus on a stationary object to maintain crisp details throughout your image.
Frequently Asked Questions
Can Light Trails Be Captured During Daytime or Only at Night?
You can capture light trails during both day and night. Daytime trails are trickier but possible with long exposures and neutral density filters. At night, you'll have an easier time creating stunning trails from various light sources.
How Do Weather Conditions Affect Light Trail Photography?
Weather conditions considerably impact your light trail photography. You'll get the best results on clear nights. Rain can create interesting reflections, but fog and mist may blur your trails. Wind can affect camera stability, so you'll need a sturdy setup.
Are There Legal Considerations When Photographing Light Trails in Public Spaces?
You should be aware of privacy laws and property rights when capturing light trails in public. Don't trespass or obstruct traffic. Some areas may restrict photography, so check local regulations. Always respect others' privacy and safety.
Can Light Trails Be Created With Non-Traffic Light Sources?
You can create light trails with various non-traffic sources. Try sparklers, glow sticks, flashlights, or LED toys. Even household items like Christmas lights or candles work. Experiment with different light sources for unique and creative results.
What Are Some Unique Subjects for Light Trail Photography Besides Cars?
You can capture unique light trails from various sources. Try shooting fireworks, Ferris wheels, star trails, light painting with flashlights, sparklers, glow sticks, or even drones. Experiment with carnival rides, cityscapes, and moving water reflections for stunning results.
In Summary
You've now opened the secrets to capturing stunning light trails with your phone camera. Armed with the right equipment, settings, and techniques, you're ready to create mesmerizing images. Remember to experiment with different locations and compositions. Don't be afraid to try light painting for unique effects. With practice and patience, you'll master the art of light trail photography. So grab your phone, head out after dark, and start creating your own luminous masterpieces!


Leave a Reply