
To capture stunning low-light landscapes, start by using your phone's Night Mode for better exposure. Stabilize your device with a mini tripod or improvised support to avoid blur. Adjust ISO and shutter speed to balance light sensitivity and motion. Focus on foreground elements to add depth and interest. Experiment with long exposures to capture light trails from cars or stars. Utilize HDR techniques for improved dynamic range. Scout for unique light sources like city lights or campfires. In post-processing, enhance details while maintaining atmosphere. Master manual camera controls for precise adjustments. With these pro tricks, you'll be well-equipped to elevate your low-light landscape photography game.
Use Night Mode

Many modern smartphones come equipped with a Night Mode feature, specifically designed for low-light photography. This mode automatically adjusts various camera settings to capture more light and detail in dark environments. When shooting low-light landscapes, you'll want to activate Night Mode to maximize your phone's capabilities.
Night Mode works by taking multiple exposures over a few seconds and then combining them into a single, well-exposed image. This process helps reduce noise and enhance details that would otherwise be lost in darkness. To use Night Mode effectively, you'll need to keep your phone steady during the capture process. Consider using a tripod or resting your device on a stable surface to avoid motion blur.
While Night Mode can produce impressive results, it's not always the best choice for every low-light situation. It's particularly effective for static scenes but may struggle with moving subjects.
Experiment with different settings and compare the results to standard shots. You might find that a combination of Night Mode and manual adjustments yields the best outcomes for your specific landscape.
Remember to focus on composition and framing, as these elements remain essential even in low-light conditions.
Stabilize Your Smartphone
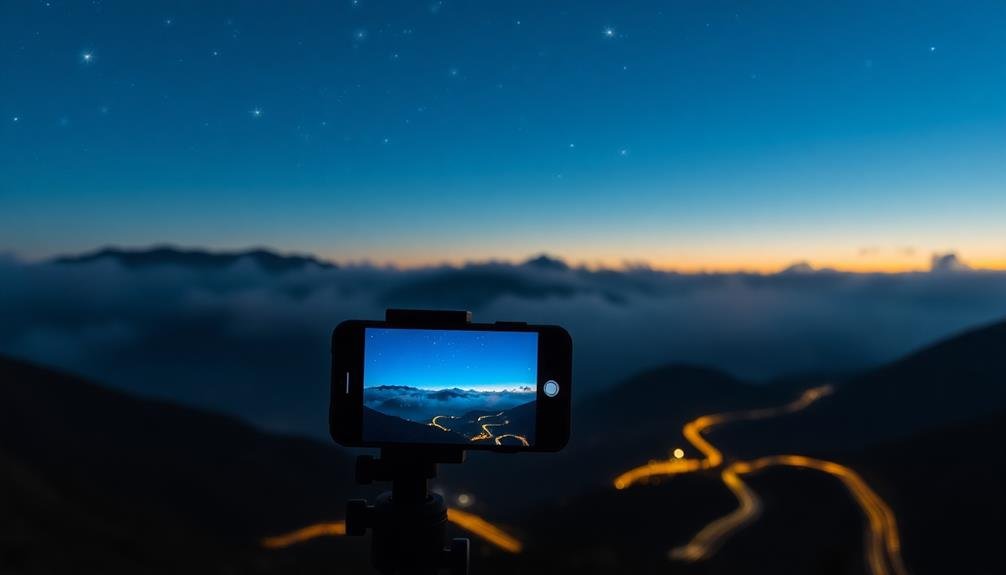
To capture sharp low-light landscapes, you'll need to keep your smartphone steady.
You can use mini tripods designed for phones or improvise with everyday objects like rocks or ledges as makeshift supports.
Don't forget to activate your phone's built-in stabilization feature, which can greatly reduce blur from minor movements.
Use Mini Tripods
One essential tool for capturing stunning low light landscapes with your smartphone is a mini tripod. These compact, lightweight devices provide stability and versatility, allowing you to set up your phone on various surfaces.
Look for a mini tripod with flexible legs that can wrap around poles or tree branches, giving you more options for unique angles and compositions.
When using a mini tripod, make sure it's securely attached to your smartphone. Many models come with universal phone mounts that can accommodate different device sizes.
Once your phone is mounted, adjust the tripod's legs to achieve a level shot. Use your phone's built-in level or grid lines to help with composition.
Mini tripods are particularly useful for long exposure shots in low light conditions. They'll keep your phone steady during extended shutter speeds, resulting in sharp, blur-free images.
You can also use them for time-lapse photography or self-portraits.
Don't forget to bring your mini tripod when you're hiking or traveling. Their small size makes them easy to carry, and you'll always be prepared for those unexpected photo opportunities.
With practice, you'll find that a mini tripod can greatly improve your low light landscape photography.
Employ Makeshift Supports
While mini tripods are incredibly useful, you won't always have one on hand. That's when you need to get creative with makeshift supports. Look around for stable surfaces like rocks, tree stumps, or even your car's hood. These can serve as impromptu platforms for your smartphone, helping you achieve that steady shot.
If you're in an urban setting, lean against walls or use railings to brace your arms. Remember, the key is to minimize camera shake. Try using the volume buttons on your headphones as a remote shutter release to avoid touching the screen.
Here's a quick guide to common makeshift supports and their best uses:
| Support Type | Indoor Use | Outdoor Use | Stability | Versatility | Availability |
|---|---|---|---|---|---|
| Rocks/Logs | No | Yes | High | Medium | High |
| Car Hood | No | Yes | High | Low | Medium |
| Walls | Yes | Yes | High | Medium | High |
| Tables | Yes | Limited | High | Medium | Medium |
| Backpack | Yes | Yes | Medium | High | High |
Don't forget to use your body as a support. Tuck your elbows into your sides, hold your breath, and gently press the shutter. With practice, you'll master the art of steady handheld shots in low light conditions.
Activate Built-In Stabilization
Modern smartphones come equipped with built-in stabilization features that can considerably enhance your low-light photography. To make the most of these tools, you'll need to activate them before shooting.
On most devices, you'll find this option in your camera app's settings under names like "Optical Image Stabilization" (OIS) or "Electronic Image Stabilization" (EIS).
Once activated, these features work to counteract small movements and vibrations, reducing blur in your images. They're particularly effective when you're shooting handheld in low light conditions, where longer exposure times are necessary.
Some phones even offer advanced stabilization modes specifically designed for night photography.
To further improve your results, combine built-in stabilization with proper shooting techniques. Hold your phone with both hands, keeping your elbows close to your body for added stability.
Take a deep breath and exhale slowly as you press the shutter button. If your phone supports it, use the volume buttons or a remote shutter release to minimize camera shake.
Adjust ISO and Shutter Speed

Photographers mastering low light landscapes must carefully balance ISO and shutter speed settings. As light fades, you'll need to increase your camera's sensitivity to capture more light.
Start by raising your ISO, but be cautious—higher ISOs introduce noise. Aim for the lowest ISO that still allows for a proper exposure. Next, adjust your shutter speed. Slower speeds let in more light but can cause motion blur. Use a tripod to steady your camera and experiment with longer exposures.
Finding the right balance between ISO and shutter speed is essential. Consider these factors:
- Subject movement: Faster shutter speeds freeze motion, while slower speeds create dreamy effects like silky water.
- Available light: Moonlit scenes may require higher ISOs and longer exposures than twilight shots.
- Desired mood: Higher ISOs can add a grainy, atmospheric quality to your images.
Focus on Foreground Elements

When capturing low light landscapes, you'll want to draw attention to foreground elements for added depth and interest.
You can use leading lines, such as a winding path or a river, to guide the viewer's eye through the image.
Consider silhouetting prominent objects against the sky or capturing reflective surfaces like still water to create stunning visual contrasts in your composition.
Use Leading Lines
One of the most effective ways to create depth and guide the viewer's eye in low light landscape photography is by using leading lines. In low light conditions, these lines become even more powerful, drawing attention to key elements within your composition. Look for natural or man-made features that create strong diagonal, curved, or converging lines, such as roads, rivers, fences, or even patterns in the sky.
When incorporating leading lines into your low light landscapes, consider the following:
- Use a wide-angle lens to exaggerate the lines and create a sense of expansiveness.
- Experiment with different perspectives to find the most compelling angle for your leading lines.
- Combine leading lines with other compositional techniques, such as the rule of thirds.
To capture these lines effectively in low light, you'll need to use a tripod and longer exposure times. This will help guarantee your images remain sharp and allow you to capture the subtle details and textures along the leading lines.
Don't be afraid to use a higher ISO if necessary, as modern cameras can produce excellent results even in challenging lighting conditions.
Silhouette Prominent Objects
While leading lines guide the viewer's eye, silhouettes create striking visual impact in low light landscapes. To achieve powerful silhouettes, position yourself so that prominent objects are between your camera and the light source. Trees, rock formations, or architectural elements work well as foreground subjects. Expose for the sky or background, allowing the foreground to become a dark, defined shape.
Experiment with different angles to find the most interesting silhouette shapes. Look for objects with distinct outlines that'll be easily recognizable even without detail. You'll want to focus on the edges of your subject to guarantee they're sharp and well-defined. Use a small aperture (high f-number) to keep both the foreground and background in focus.
Don't forget to take into account the overall composition. Place your silhouetted subject off-center using the rule of thirds for a more dynamic image. You can also include multiple silhouetted elements to create depth and interest.
Capture Reflective Surfaces
Reflective surfaces can transform your low light landscapes into enchanting, multidimensional scenes. By focusing on foreground elements like still water, wet sand, or glossy rocks, you'll add depth and interest to your compositions. These reflections not only mirror the sky and surrounding landscape but also capture the subtle hues of twilight or moonlight.
To make the most of reflective surfaces in low light:
- Use a tripod to steady your camera for longer exposures
- Experiment with different shutter speeds to capture movement or stillness in the reflections
- Consider using a polarizing filter to control the intensity of reflections
When composing your shot, look for symmetry or interesting contrasts between the reflected image and its source. You'll often find that the reflection appears more vibrant or detailed than the actual subject, creating a fascinating visual effect.
Don't be afraid to get low to the ground to maximize the reflective surface in your frame. Remember, even small puddles or dew-covered leaves can create stunning reflections in low light conditions.
Capture Light Trails

Light trails add a dynamic and mesmerizing element to low-light landscape photography. To capture these streaks of light, you'll need a camera with manual settings, a sturdy tripod, and a remote shutter release.
Set your camera to manual mode and choose a low ISO (100-400) to minimize noise. Select a small aperture (f/8 to f/16) for a wider depth of field and longer exposure times.
Start with a shutter speed of 10-30 seconds, adjusting as needed based on the speed of moving lights and desired trail length. Position your camera to frame the scene, including the path of moving vehicles or other light sources.
Focus manually on a stationary object in the frame, then switch to manual focus to prevent refocusing during exposure.
Experiment with different compositions, such as winding roads, city streets, or star trails. Use leading lines to guide the viewer's eye through the image.
Consider incorporating stationary elements like buildings or landscapes to provide context and contrast. Don't forget to check your histogram and adjust settings as needed.
With practice, you'll master the art of capturing stunning light trails in your low-light landscapes.
Experiment With Long Exposures

Long exposures open up a world of creative possibilities in low-light landscape photography. By keeping your camera's shutter open for extended periods, you'll capture motion and light in ways that transform ordinary scenes into ethereal masterpieces.
Start with exposures of several seconds and gradually increase to minutes, experimenting with different settings to achieve your desired effect.
To master long exposures, you'll need a few essential tools:
- A sturdy tripod to keep your camera perfectly still
- A remote shutter release or intervalometer to avoid camera shake
- Neutral density filters to control light intake in brighter conditions
Begin by scouting locations with moving elements like water, clouds, or stars. As darkness falls, set your camera to manual mode and use a low ISO to minimize noise.
Choose a narrow aperture (high f-number) for greater depth of field, and adjust your shutter speed accordingly. Remember, longer exposures will create smoother, more surreal effects in moving subjects.
Don't be afraid to push the boundaries and try extreme exposure times – you might be surprised by the results. With practice, you'll develop an intuitive sense for crafting stunning long-exposure landscapes that captivate viewers and showcase the beauty of low-light scenes.
Utilize HDR Techniques

HDR techniques can elevate your low light landscapes to new levels of detail and drama.
You'll want to bracket your exposures effectively, capturing a range of shots from underexposed to overexposed.
Once you've collected your bracketed images, seamlessly blend them together in post-processing to create a final image with enhanced dynamic range and rich tonality.
Bracket Exposures Effectively
To capture the full dynamic range of a low-light landscape, you'll want to master exposure bracketing and HDR techniques. Bracketing involves taking multiple shots of the same scene at different exposure levels, typically underexposed, properly exposed, and overexposed. This guarantees you've captured details in both the shadows and highlights, which can be combined later in post-processing.
Start by setting your camera to Aperture Priority mode and enabling Auto Exposure Bracketing (AEB). Choose an aperture that provides sufficient depth of field, usually between f/8 and f/11. Set your ISO as low as possible to minimize noise, and adjust your shutter speed accordingly. Most cameras allow you to bracket three to five exposures, typically in 1-stop increments.
When bracketing, remember:
- Use a sturdy tripod to maintain consistent framing
- Enable your camera's timer or use a remote shutter release to avoid camera shake
- Review your histogram to verify you've captured the full tonal range
In post-processing, merge your bracketed exposures using HDR software or manual blending techniques in Photoshop. This will result in a final image with rich details across the entire tonal range, from deep shadows to bright highlights.
Blend Multiple Images Seamlessly
Image blending wizardry brings your bracketed exposures to life, transforming them into a single, stunning HDR landscape. To achieve seamless blends, you'll need specialized software like Adobe Lightroom, Photomatix, or Aurora HDR. These tools offer automated merging, but you'll often get better results with manual adjustments.
Start by aligning your images precisely, compensating for any slight camera movement between shots. Next, adjust the tone mapping to balance highlights, shadows, and midtones. Be careful not to push this too far, as overly processed HDR can look unnatural. Instead, aim for a realistic representation of the scene's dynamic range.
Pay close attention to areas where exposures meet, such as the horizon or edges of objects. Use masking techniques to smooth these shifts and eliminate ghosting from moving elements like clouds or water.
Don't forget to fine-tune color saturation and contrast to maintain a cohesive look across the entire image.
Find Unique Light Sources

While natural light sources like the moon and stars can create stunning low-light landscapes, don't overlook unique artificial light sources to add interest and depth to your shots. Look for opportunities to incorporate city lights, street lamps, or even car headlights into your compositions. These elements can create striking contrasts and lead the viewer's eye through the image.
Experiment with different types of artificial lighting to achieve various effects. For instance, warm-toned lights can add a cozy atmosphere to your landscape, while cool-toned lights can create a more mysterious or futuristic mood. You can also use light painting techniques to introduce your own light sources into the scene, giving you complete control over the illumination.
When searching for unique light sources, consider:
- Exploring industrial areas with interesting lighting fixtures
- Visiting amusement parks or festivals with colorful illuminations
- Capturing the glow of campfires or bonfires in natural settings
Remember to adjust your camera settings to accommodate these light sources. Use a longer exposure time to capture the full effect of dimmer lights, and experiment with different white balance settings to accurately represent the color of the light in your final image.
Edit for Enhanced Details

The art of editing can transform a good low-light landscape shot into a breathtaking masterpiece. When you're working with low-light images, focus on enhancing details without introducing noise.
Start by adjusting the exposure and shadows to bring out hidden elements in darker areas. Be careful not to overdo it, as this can lead to a loss of atmosphere.
Next, fine-tune the contrast and clarity settings to add depth and texture to your landscape. Use the dehaze tool sparingly to cut through any atmospheric haze without making the image look unnatural.
Pay special attention to the highlights, ensuring they're not blown out and retaining detail in brighter areas like the moon or city lights.
Color adjustments are essential in low-light editing. Experiment with white balance to achieve the desired mood, and use selective color adjustments to emphasize specific elements.
Don't shy away from using local adjustments like brushes or gradients to target specific areas of your image.
Master Manual Camera Controls

To truly excel at low-light landscape photography, you'll need to master your camera's manual controls. Start by familiarizing yourself with the exposure triangle: aperture, shutter speed, and ISO.
In low-light conditions, you'll often need to push these settings to their limits. Open your aperture wide to let in more light, but be mindful of depth of field. Slow down your shutter speed to capture more light, but use a tripod to avoid camera shake. Increase your ISO as needed, but be aware of potential noise in your images.
Learn to use your camera's spot metering mode to accurately gauge exposure in tricky lighting situations. Experiment with long exposures to capture stunning light trails or smooth out water surfaces. Don't forget to utilize your camera's bulb mode for exposures longer than 30 seconds.
Key manual controls to master:
- Aperture priority mode (A or Av)
- Shutter priority mode (S or Tv)
- Manual mode (M)
Practice adjusting these settings quickly and confidently in various lighting conditions. With time and experience, you'll develop an intuitive understanding of how to balance these controls to achieve the perfect exposure for your low-light landscape shots.
Frequently Asked Questions
How Do I Protect My Camera From Moisture During Night Shoots?
To protect your camera from moisture at night, use a waterproof cover or rain sleeve. Keep silica gel packets in your camera bag. Don't immediately bring your cold gear inside; let it warm up gradually to prevent condensation.
What's the Best Way to Scout Locations for Low-Light Landscape Photography?
You'll want to research online, use apps like PhotoPills, and explore during daylight. Scout for interesting foreground elements, clear views of the sky, and safe access points. Don't forget to check local regulations and weather forecasts.
Are There Any Safety Considerations When Shooting Landscapes at Night?
When shooting landscapes at night, you'll want to prioritize safety. Always bring a buddy, use headlamps, and tell someone your plans. Watch for uneven terrain, wildlife, and weather changes. Don't forget extra batteries and warm clothing.
How Can I Minimize Lens Flare in Low-Light Urban Landscape Shots?
To minimize lens flare in low-light urban landscapes, you'll want to use a lens hood, avoid direct light sources in your frame, and experiment with different angles. You can also try using your hand to block stray light.
What's the Ideal Time to Capture the Blue Hour for Landscape Photography?
You'll want to catch the blue hour about 20-30 minutes after sunset or before sunrise. It's brief, so be ready! Watch for deep blue skies and city lights balancing perfectly. Don't miss this magical moment!
In Summary
You've now got the tools to take your low light landscape photography to the next level. Don't be afraid to experiment with these pro tricks. Practice adjusting settings, finding unique compositions, and editing your shots. Remember, patience is key in low light conditions. Keep honing your skills, and you'll soon be capturing stunning nighttime landscapes that'll wow your audience. So grab your smartphone, head out after dark, and start creating some magic!


Leave a Reply