
Long exposure elevates your mobile landscape photography by adding a dynamic element to static scenes. You'll capture motion blur in clouds, water, and foliage, creating a dramatic contrast with stationary objects. This technique transforms flowing water into silky ribbons and clouds into ethereal streaks. At night, you can capture mesmerizing light trails from traffic or stars. Long exposures also allow for minimalist compositions, emphasizing key elements against simplified backgrounds. With the right apps and accessories, you'll enhance colors, overcome low-light limitations, and achieve professional-quality results. Mastering this technique opens up a world of creative possibilities for your mobile photography.
Motion Blur for Dramatic Effect

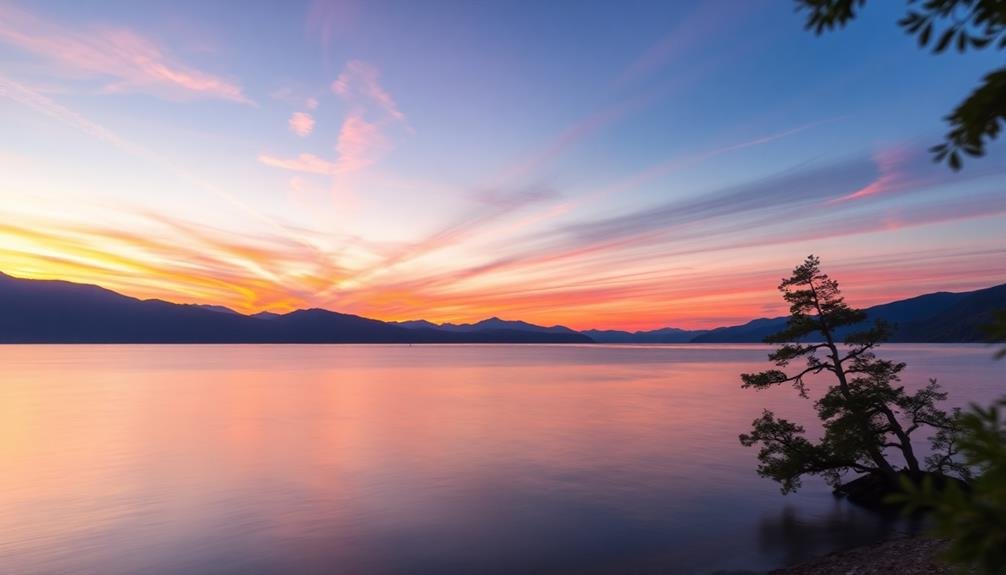
In spite of the limitations of mobile cameras, you can create stunning motion blur effects in your landscape photography. By using long exposure techniques, you'll capture the movement of clouds, water, or foliage, adding a dynamic and dreamlike quality to your images.
This technique works particularly well with flowing water, transforming streams and waterfalls into silky ribbons of motion.
To achieve this effect, you'll need to stabilize your phone using a tripod or steady surface. Many mobile camera apps now offer manual controls, allowing you to adjust shutter speed. Aim for exposures between 1 and 30 seconds, depending on the scene and desired effect.
In bright conditions, use a neutral density filter to prevent overexposure.
When composing your shot, look for elements that contrast static and moving objects. A rocky shoreline against blurred waves or a sturdy tree amidst wind-swept grass can create compelling visual tension.
Experiment with different shutter speeds to find the right balance between blur and detail. Remember, motion blur isn't just about aesthetics; it can convey mood, passage of time, and the raw power of nature in your landscape photos.
Smoothing Water and Clouds
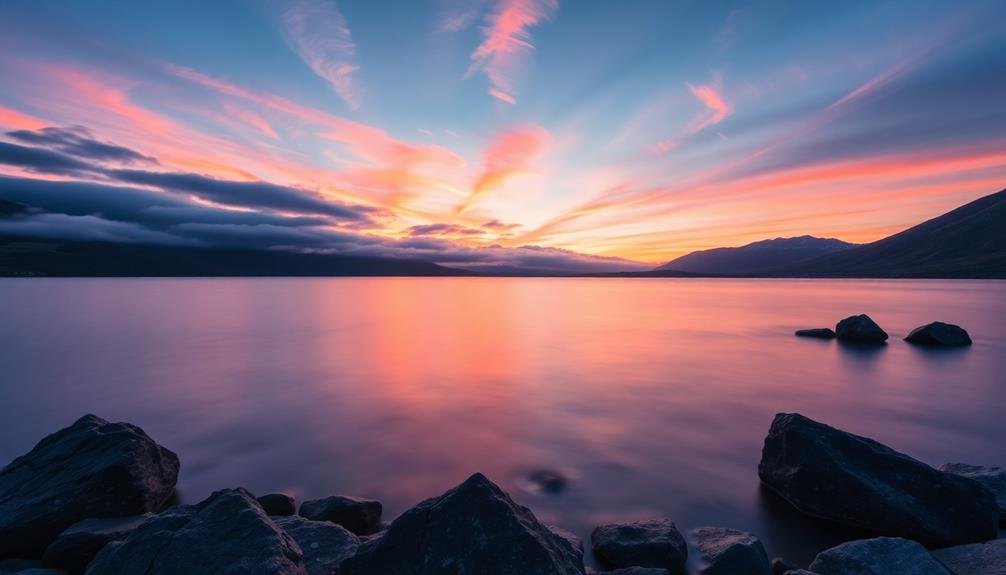
Along with creating motion blur, long exposure techniques excel at smoothing water and clouds in landscape photography. When you're capturing scenes with moving water or drifting clouds, a long exposure can transform these dynamic elements into silky, ethereal textures.
For water, this technique works particularly well with waterfalls, rivers, and ocean waves, turning choppy surfaces into misty, dreamlike expanses. To achieve this effect, you'll need to use a longer shutter speed, typically ranging from 1 to 30 seconds, depending on the water's movement speed.
For clouds, you might extend this to several minutes to capture their slow drift across the sky. You'll need to stabilize your mobile device using a tripod or sturdy surface to avoid camera shake during these extended exposures.
The result is a striking contrast between the smoothed water or clouds and the sharp, stationary elements in your composition, such as rocks, trees, or buildings. This juxtaposition adds depth and visual interest to your landscape photos, creating a sense of tranquility and timelessness that can elevate your mobile photography to new artistic heights.
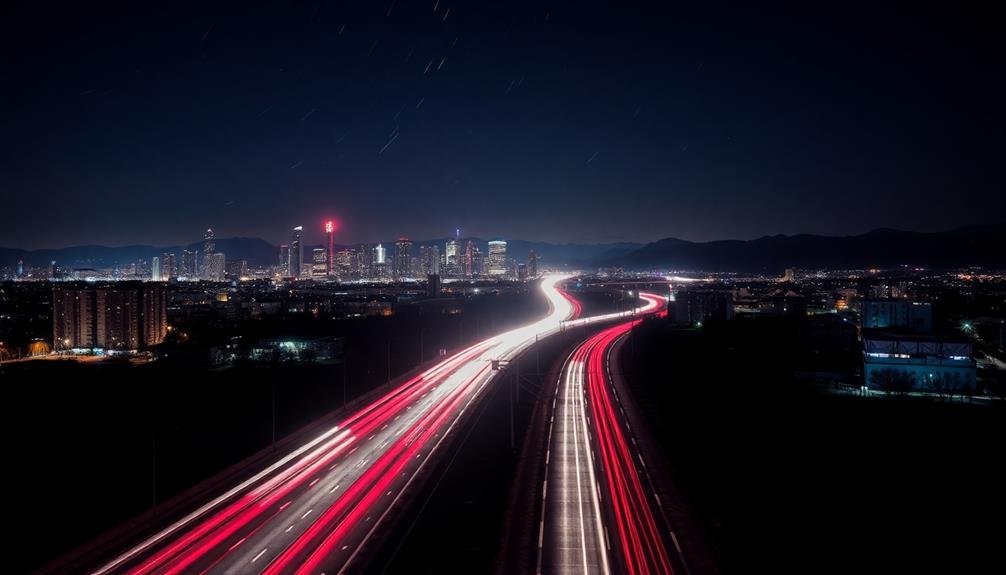
Capturing Light Trails at Night
To capture stunning light trails at night with your smartphone, you'll need to adjust your camera settings and use some essential equipment.
You'll find the best results in urban areas with busy traffic or along highways where vehicles create mesmerizing streaks of light.
Experiment with different techniques, such as varying your exposure time or combining multiple exposures, to achieve the perfect light trail effect in your mobile landscape photography.
Equipment and Camera Settings
Capturing light trails at night requires specific equipment and camera settings to achieve stunning results. You'll need a sturdy tripod to keep your smartphone stable during long exposures. A remote shutter or timer app is crucial to prevent camera shake when triggering the shot. Consider using a neutral density filter to reduce light intake, allowing for longer exposures even in brighter conditions.
For camera settings, switch to manual mode or use a long exposure app. Set your ISO as low as possible, typically 100 or 200, to minimize noise. Choose a small aperture (high f-number) to increase depth of field and sharpness. Experiment with shutter speeds between 10 and 30 seconds, depending on the speed of moving lights and desired trail length.
Use manual focus to guarantee your scene remains sharp throughout the exposure. White balance should be set to tungsten or a cool temperature to counteract the warm glow of artificial lights. Enable your phone's HDR mode to capture a wider dynamic range.
Remember to shoot in RAW format if your device supports it, giving you more flexibility in post-processing to fine-tune your light trail images.
Best Locations and Techniques
Now that you've mastered the technical aspects, let's explore the best locations and techniques for capturing light trails at night. Urban environments offer the most opportunities for stunning light trail photography. Busy intersections, highways, and bridges are prime spots to capture the flow of traffic.
Position yourself at an elevated vantage point for a more dynamic composition.
To capture the best light trails, follow these techniques:
- Use a tripod to keep your phone steady during long exposures
- Experiment with different shutter speeds to achieve desired trail length
- Frame your shot to include interesting background elements
- Time your exposures to capture peak traffic flow
Consider incorporating architectural elements or city skylines to add depth to your compositions. Curved roads and roundabouts can create mesmerizing circular light trails.
For a unique perspective, try shooting from pedestrian overpasses or parking garages.
Don't limit yourself to vehicle lights. Ferris wheels, carousels, and other moving attractions at amusement parks can produce enchanting light trails.
Experiment with different focal lengths and compositions to create visually striking images that showcase the energy and movement of the night scene.
Minimalist Compositions With Long Exposures
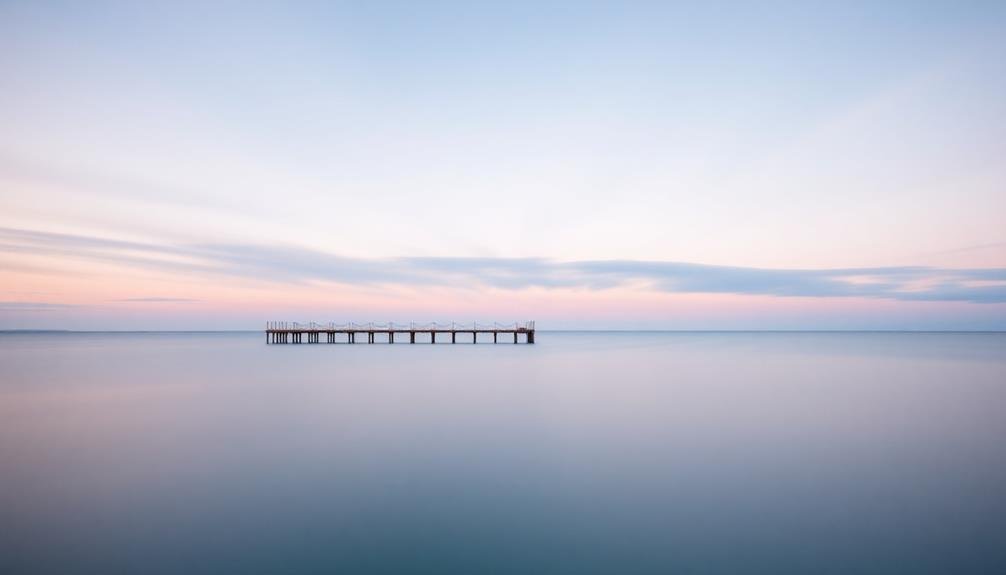
Long exposure photography lends itself beautifully to minimalist compositions, stripping away distractions and emphasizing clean lines and shapes.
When you're aiming for a minimalist approach with your mobile long exposures, focus on isolating a single element against a simplified background. Look for stark contrasts, like a lone tree in a misty field or a solitary pier extending into calm waters.
Use negative space to your advantage. The blurred motion of clouds or water can create vast, empty areas that draw attention to your main subject.
Experiment with different shutter speeds to achieve the desired level of smoothness in moving elements. For water, try exposures between 1-30 seconds; for clouds, you might need several minutes.
Compose your shot with balance in mind. The rule of thirds can be particularly effective in minimalist photography, helping you place your subject for maximum impact.
Don't be afraid to leave large portions of your frame empty; this emptiness can be as powerful as the subject itself.
Enhancing Colors and Tones
While long exposures can create dreamy, ethereal images, they often wash out colors and flatten tones. To counteract this effect and enhance your mobile landscape photography, you'll need to employ some post-processing techniques.
Start by adjusting the white balance to bring out the natural colors of the scene. Then, boost the saturation and vibrance slightly to make the colors pop without appearing unnatural.
Pay special attention to the following elements to enhance colors and tones:
- Sky: Adjust the blues and add gradient filters to create depth
- Water: Increase clarity and adjust highlights to bring out reflections
- Foliage: Enhance greens and yellows for a more vibrant look
- Rocks or structures: Boost contrast and texture to add dimensionality
Don't be afraid to use selective adjustments to target specific areas of your image. Experiment with split-toning to add warmth to highlights and coolness to shadows, creating a more dynamic overall look.
Overcoming Low Light Limitations

Low light conditions present unique challenges for mobile landscape photography, especially when attempting long exposures. However, you can overcome these limitations by employing specific techniques and tools. First, stabilize your phone using a tripod or sturdy surface to prevent camera shake during extended exposures. Next, utilize manual camera controls or specialized apps to adjust ISO, shutter speed, and aperture settings.
To further enhance your low-light capabilities, consider the following strategies:
| Technique | Benefit | Drawback |
|---|---|---|
| Night mode | Improved detail | Limited exposure control |
| External lens | Increased light gathering | Additional equipment needed |
| Light painting | Creative effects | Requires practice |
| Stacking exposures | Reduced noise | Post-processing intensive |
Essential Apps and Accessories

To capture stunning long exposure landscapes on your mobile device, you'll need the right tools and apps.
Let's explore the best long exposure apps available, along with essential mobile camera gear that can elevate your shots.
We'll also break down various stabilization tools that will help you achieve crisp, professional-looking results in your mobile landscape photography.
Best Long Exposure Apps
In light of the rapid advancements in smartphone technology, long exposure photography is no longer confined to traditional cameras. A variety of apps now enable you to capture stunning long exposure shots right from your mobile device.
These apps offer features like manual shutter speed control, exposure compensation, and built-in filters to enhance your landscape photography.
When selecting a long exposure app, consider the following key features:
- Manual control over shutter speed, ISO, and focus
- RAW file support for better post-processing flexibility
- Live preview of long exposure effects
- Ability to stack multiple exposures for enhanced results
Some of the top-rated long exposure apps include Slow Shutter Cam, ProCam, and NightCap Camera.
These apps provide intuitive interfaces and powerful features that allow you to experiment with different exposure times and techniques. You'll find options for light trails, motion blur, and low-light photography, giving you the tools to create enchanting landscape images.
As you explore these apps, you'll discover that they can considerably expand your creative possibilities, transforming ordinary scenes into extraordinary works of art.
Essential Mobile Camera Gear
While apps are a key component of mobile long exposure photography, they're not the only tools you'll need. To elevate your mobile landscape shots, you'll want to invest in some essential gear.
First, get a sturdy tripod. Long exposures require absolute stillness, and handheld shots won't cut it. Look for a compact, lightweight tripod that's easy to carry. A smartphone mount is vital; it securely attaches your device to the tripod.
Next, consider neutral density (ND) filters. These reduce light entering the lens, allowing for longer exposures even in bright conditions. Clip-on ND filters designed for smartphones are readily available.
A remote shutter release helps minimize camera shake when triggering the shot. Many Bluetooth remotes are compatible with both iOS and Android devices.
For serious enthusiasts, an external lens can expand your creative possibilities. Wide-angle lenses are particularly useful for landscapes.
Don't forget practical items like a portable charger and weatherproof case. Long exposure shots drain battery quickly, and you'll want to protect your device in various outdoor conditions.
With this gear, you'll be well-equipped to capture stunning long exposure landscapes on your mobile device.
Stabilization Tools Explained
Now that you've got your essential gear, let's plunge into the world of stabilization tools. These accessories are vital for achieving sharp, blur-free long exposure shots with your mobile device. A sturdy tripod is your primary defense against camera shake, but there are other tools to take into account.
Remote shutter releases allow you to trigger your camera without touching it, eliminating vibrations caused by manual operation. Many smartphone apps offer this functionality, or you can opt for a Bluetooth remote. For added stability, especially in windy conditions, think about a sandbag or weight to anchor your tripod.
Here are four key stabilization tools to elevate your mobile long exposure photography:
- Tripod with smartphone mount
- Remote shutter release (app or Bluetooth)
- Tripod weight or sandbag
- Image stabilization apps
While your phone's built-in stabilization helps, dedicated apps can further reduce shake and improve image quality.
These tools work together to guarantee your long exposure shots are crisp and professional-looking. By mastering these stabilization techniques, you'll be well on your way to capturing stunning landscape images that rival those taken with traditional cameras.
Frequently Asked Questions
How Do I Prevent Camera Shake During Long Exposures on a Smartphone?
To prevent camera shake during long exposures on your smartphone, use a tripod or stabilize it against a solid surface. Enable your device's timer or use a remote shutter. Keep your hands off the phone while capturing the image.
Can Long Exposure Photography Damage My Phone's Camera Sensor?
Don't worry, long exposure photography won't damage your phone's camera sensor. It's designed to handle extended light exposure. However, you should be cautious about overheating during prolonged use, which can affect overall device performance.
What's the Maximum Exposure Time Possible on Most Smartphone Cameras?
You'll find that most smartphone cameras offer a maximum exposure time of 30 seconds. However, some advanced models or third-party apps can extend this to several minutes. It's best to check your specific device's capabilities for precise limits.
How Do I Achieve Long Exposures in Bright Daylight Conditions?
To achieve long exposures in bright daylight, you'll need a neutral density filter. Attach it to your phone's lens, use a tripod for stability, and select the lowest ISO. Don't forget to enable manual exposure controls in your camera app.
Are There Any Post-Processing Techniques Specific to Long Exposure Mobile Photography?
You'll want to focus on adjusting exposure, enhancing contrast, and reducing noise in your long exposure mobile photos. Don't forget to fine-tune highlights and shadows, and consider using selective editing to emphasize key elements in your composition.
In Summary
You've discovered how long exposure can transform your mobile landscape photography. By embracing motion blur, smoothing water and clouds, capturing light trails, creating minimalist compositions, enhancing colors, and overcoming low light challenges, you've elevated your images to new heights. With the right apps and accessories, you're now equipped to experiment and push the boundaries of your mobile photography. Don't be afraid to get creative and let long exposures reveal a whole new world of artistic possibilities.


Leave a Reply