
Great night panoramas on your phone start with a steady hand and proper technique. You'll want to use Night Mode and adjust exposure settings to capture more light in low-light conditions. Composition is key, so look for interesting elements like city skylines or landmarks to anchor your shot. Use leading lines and the rule of thirds to create a balanced image. Don't forget to stabilize your phone with a tripod or stable surface for sharper results. Post-processing can enhance your panorama by adjusting contrast and reducing noise. With the right timing and subject selection, you'll be on your way to capturing breathtaking nighttime vistas.
Steady Camera Technique

In spite of your phone's advanced stabilization features, a steady hand is vital for capturing sharp night panoramas. To achieve this, start by planting your feet firmly on the ground, shoulder-width apart. Tuck your elbows close to your body and use both hands to hold your phone. This creates a stable triangle between your arms and chest.
When panning, rotate your entire upper body smoothly, rather than just moving your arms. This reduces shake and guarantees a more consistent motion. For even better stability, lean against a wall or sturdy object if available. Alternatively, use a small tripod or phone grip to eliminate hand-held shake entirely.
Breath control is important. Take a deep breath, then exhale slowly as you pan. This helps minimize subtle body movements that can blur your image. If your phone has a voice-activated shutter, use it to avoid touching the screen.
Adequate Lighting Conditions
When capturing night panoramas, you'll need to contemplate your light sources carefully.
Artificial lights, such as street lamps or building illuminations, can add striking elements to your composition.
For a more natural look, you might opt for moonlit landscapes, which can create a softer, ethereal atmosphere in your panoramic shots.
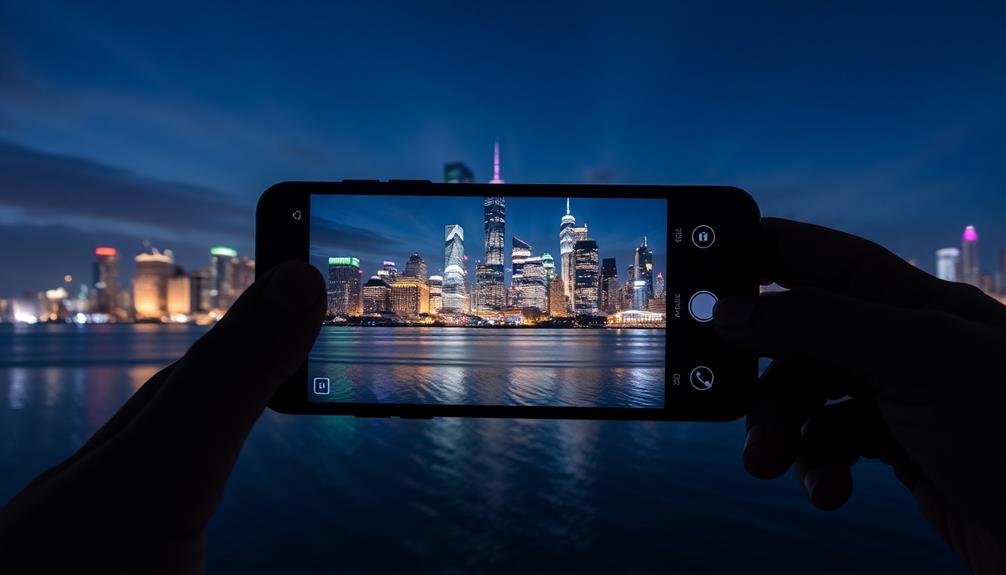
Artificial Light Sources
Artificial light sources can considerably enhance your night panoramas when natural light is scarce. Street lamps, neon signs, and illuminated buildings can add depth, color, and interest to your shots.
Look for areas with a mix of light intensities and colors to create dynamic compositions.
When incorporating artificial lights, be mindful of their color temperature. Sodium vapor lamps often cast an orange glow, while LED lights tend to be cooler. You can use these variations to your advantage by adjusting your white balance settings or embracing the color contrasts in your panorama.
Don't overlook the potential of car headlights and taillights. These moving light sources can create striking light trails in your panoramas if you use a longer exposure time.
Position yourself at a vantage point where you can capture the flow of traffic alongside other illuminated elements in your scene.
Remember that artificial lights can also cause unwanted glare or hotspots. Use your hand or a small object to shield your phone's lens from direct light sources.
This technique, known as flagging, can help you maintain better control over the light in your panoramic shots.
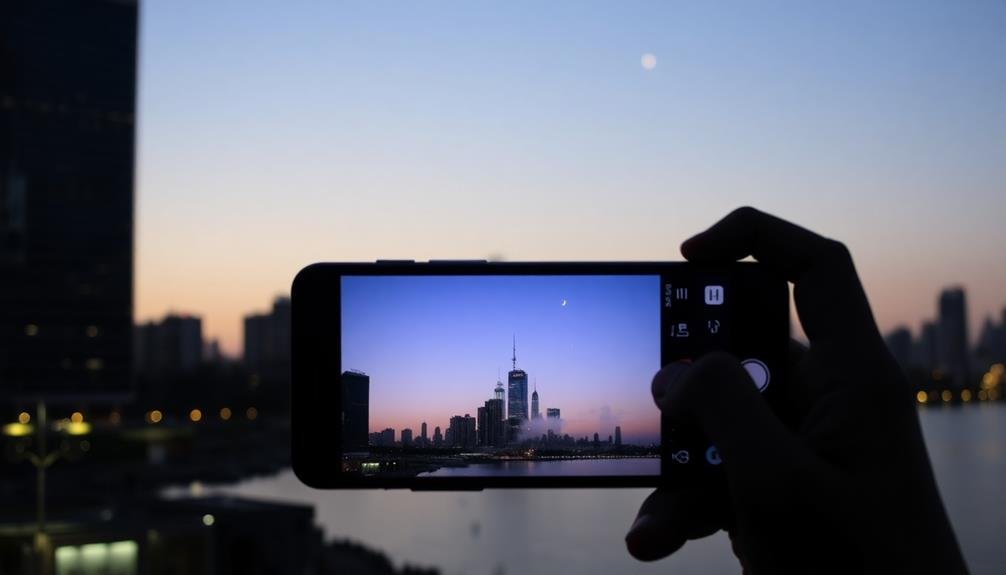
Moonlit Landscapes
Moonlit landscapes offer a unique opportunity to capture stunning night panoramas with natural illumination. The moon's soft glow can create ethereal scenes that are perfect for your phone's camera. To make the most of these conditions, plan your shoot around the lunar cycle. A full moon provides the most light, but even a quarter moon can illuminate your surroundings beautifully.
When shooting moonlit landscapes, you'll want to find a clear, open area with minimal light pollution. This will allow the moon's light to dominate the scene. Use your phone's night mode or manual settings to capture more detail. Set a longer exposure time to gather more light, but be careful not to overexpose the moon itself.
You can also experiment with silhouettes by positioning objects in the foreground against the moonlit sky.
To create a panorama, keep your phone steady and move it slowly as you capture multiple images. Many phones now have a dedicated panorama mode that can help with this process. Remember to focus on the brightest part of the scene, which is often the moon or the area it's illuminating directly.
With practice, you'll be able to capture breathtaking moonlit panoramas that showcase the night's natural beauty.
Panorama Mode Settings
When capturing night panoramas, you'll want to enable your phone's Night Mode for enhanced low-light performance.
Adjust your exposure settings to balance the bright and dark areas of your scene, ensuring details aren't lost in shadows or highlights.
To maintain image sharpness, stabilize your phone using a tripod or by bracing it against a steady surface as you pan.
Enable Night Mode
To capture stunning night panoramas, you'll need to enable your phone's Night Mode within the panorama settings. This feature allows your camera to take in more light, resulting in clearer and brighter images in low-light conditions. Look for the Night Mode icon, usually represented by a moon or stars, and toggle it on before starting your panorama.
When Night Mode is activated, your phone will automatically adjust its exposure settings. It'll use a slower shutter speed to let in more light and increase the ISO to boost sensitivity.
These changes mean you'll need to hold your phone steady for longer, so consider using a tripod or stable surface for the best results.
Some phones offer additional Night Mode options for panoramas. You might find settings to adjust the brightness, contrast, or color temperature. Experiment with these to find the perfect balance for your scene.
Adjust Exposure Settings
Despite Night Mode's automatic adjustments, you'll often need to fine-tune your exposure settings for the best night panoramas. Start by tapping on the screen to focus, then look for the exposure slider. Drag this up or down to brighten or darken your image. For night scenes, you'll typically want to increase exposure slightly to capture more detail in dark areas.
Next, check if your phone offers manual controls. If so, adjust the ISO and shutter speed. Lower ISO values (e.g., 100-400) reduce noise but require longer exposure times. Higher ISO (800-3200) allows for faster shutter speeds but may introduce graininess. For panoramas, aim for a balanced ISO around 400-800.
Shutter speed is essential for night shots. Longer exposures (1-4 seconds) capture more light but may blur moving objects. Shorter exposures (1/4-1 second) freeze motion but gather less light. For stationary scenes, opt for longer exposures. If there's movement, use a faster shutter speed and compensate with higher ISO or wider aperture.
Experiment with these settings to find the right balance for your specific night scene. Remember, the goal is to capture enough light while maintaining sharpness across the entire panorama.
Stabilize Your Phone
Steady hands are essential for capturing sharp night panoramas. When shooting in low light, even the slightest movement can result in blurry images. To stabilize your phone and guarantee crisp, clear panoramas, you'll need to employ some techniques and tools.
First, consider using a tripod or stabilizing mount for your phone. These devices provide a solid foundation, eliminating hand tremors and guaranteeing consistent framing as you pan. If you don't have a tripod, try resting your phone on a stable surface like a ledge or table.
When holding your phone, use both hands and keep your elbows tucked close to your body for added stability. Take a wide stance and breathe steadily to minimize body movement. As you pan, move your entire upper body smoothly rather than just your arms.
Here are some additional tips to stabilize your phone for night panoramas:
- Use your phone's voice control or timer feature to trigger the shutter without touching the screen
- Enable image stabilization in your camera app if available
- Avoid windy conditions or find shelter to reduce phone movement
- Practice smooth panning motions before capturing your final shot
Composition and Framing

Once you've found your perfect night scene, it's time to focus on composition and framing. Start by identifying strong elements that can anchor your panorama, such as city skylines, illuminated landmarks, or interesting architectural features. These focal points will draw the viewer's eye and create a sense of depth in your image.
Consider the rule of thirds when framing your shot. Place key elements along the imaginary grid lines or at their intersections to create a balanced and visually appealing composition.
Don't forget to include foreground elements to add depth and context to your panorama. Pay attention to leading lines, such as roads, bridges, or rivers, which can guide the viewer's gaze through the image. Incorporate reflections in water bodies or glass surfaces to add symmetry and interest to your composition.
When framing your panorama, leave some breathing room around the edges. This will give you flexibility to crop and adjust the image later if needed. Experiment with different angles and perspectives to find the most enchanting view of your chosen scene.
Post-Processing and Editing

After you've captured your night panorama, it's time to plunge into post-processing and editing to bring out the best in your image. Most smartphone photo apps offer powerful tools to enhance your night shots.
Start by adjusting the exposure and contrast to reveal hidden details in shadows while maintaining the rich, dark atmosphere. Fine-tune the white balance to accurately represent the nighttime colors or create a mood that matches your vision.
Next, focus on sharpening your image. Night panoramas often suffer from noise, so use noise reduction tools carefully to maintain detail while smoothing out graininess.
Don't shy away from local adjustments; use selective editing to brighten specific areas or enhance particular elements in your panorama.
Consider these advanced techniques to elevate your night panorama:
- HDR blending to balance bright lights and dark shadows
- Luminosity masking for precise exposure control
- Color grading to create a cohesive atmosphere
- Subtle vignetting to draw attention to the center of your image
Subject Selection and Timing

Choosing the right subject and timing is essential for capturing stunning night panoramas with your phone. Look for scenes with a mix of light sources, such as cityscapes with illuminated buildings, bridges, or monuments. Natural landscapes can also work well, especially if there's moonlight or star-filled skies.
Timing is vital. The "blue hour" – just after sunset or before sunrise – often provides the best balance between ambient light and artificial illumination. This period typically lasts 20-30 minutes, so be prepared. For urban shots, weekends or holidays may offer more vibrant nightlife and illuminated structures.
Consider the moon phase; a full moon can provide natural lighting for landscapes but may wash out stars. Conversely, a new moon allows for better stargazing opportunities. Weather conditions also play a role; clear skies are ideal for star trails, while some cloud cover can add drama to city scenes.
Patience is key. Wait for the right moment when traffic patterns create interesting light trails or when the clouds part to reveal the moon.
Frequently Asked Questions
Can I Use a Tripod for Night Panoramas With My Smartphone?
Yes, you can use a tripod for night panoramas with your smartphone. It'll help keep your device steady, reducing blur and allowing for longer exposures. This results in sharper, clearer images with better detail and less noise.
How Do I Avoid Lens Flare in Night Panorama Shots?
To avoid lens flare in night panorama shots, you'll want to shield your lens from direct light sources. Use your hand or a lens hood to block stray light. Also, try adjusting your angle slightly to minimize reflections.
What's the Best File Format for Saving High-Quality Night Panoramas?
For high-quality night panoramas, you'll want to save in RAW format. It captures more data and allows for better post-processing. If that's not available, use TIFF or high-quality JPEG to preserve detail and minimize compression artifacts.
Are There Specific Apps That Enhance Night Panorama Photography on Smartphones?
You'll find several apps that boost night panoramas on smartphones. Try ProCam, NightCap Camera, or Slow Shutter Cam. They offer manual controls, long exposure features, and noise reduction, helping you capture stunning low-light panoramic shots with ease.
How Do I Correct Color Temperature Issues in Night Panorama Photos?
You can correct color temperature in night panoramas by adjusting white balance in editing apps. Use sliders to warm up or cool down the image. Don't forget to fine-tune individual colors for a balanced result.
In Summary
You've now got the tools to capture stunning night panoramas with your phone. Remember to keep your camera steady, find the right lighting, and use your panorama mode effectively. Frame your shots thoughtfully and choose interesting subjects. Don't forget to experiment with timing for unique effects. Finally, enhance your images with post-processing. With practice, you'll be creating breathtaking night panoramas that'll wow your friends and followers. So get out there and start shooting!


Leave a Reply