
To capture stunning night sky photos with your phone, start by adjusting manual camera settings. Switch to Pro mode, set a high ISO, and use the "500 rule" for shutter speed. Next, stabilize your device with a tripod or DIY solution to minimize shake. Maximize your phone's night mode capabilities by updating software and experimenting with exposure times. Find the perfect dark location away from city lights, using tools like Dark Site Finder. Finally, master long exposure techniques by controlling ISO and shutter speed with specialized apps. These pro tricks will elevate your nighttime photography, but there's even more to explore in the celestial domain.
Adjust Manual Camera Settings

Almost every smartphone today offers manual camera controls, which are essential for capturing stunning night sky photos.
To start, switch your camera app to Pro or Manual mode. Set your ISO between 1600 and 3200, depending on your phone's capabilities and the darkness of your location. A higher ISO increases light sensitivity but also introduces more noise.
Next, adjust your shutter speed. For pinpoint stars, use the "500 rule": divide 500 by your lens's focal length to determine the maximum exposure time before stars start to trail. Most phone cameras have a 28mm equivalent lens, so aim for 15-20 seconds. If you want star trails, experiment with longer exposures.
Set your focus to infinity by tapping the furthest point in your frame. Fine-tune it manually if needed. Use the widest aperture available (lowest f-number) to let in more light.
Finally, enable your phone's timer or use a remote shutter to avoid camera shake when taking the photo.
Remember to shoot in RAW format if your phone supports it, as this allows for more flexibility in post-processing.
With these settings dialed in, you're ready to capture the night sky's wonders.
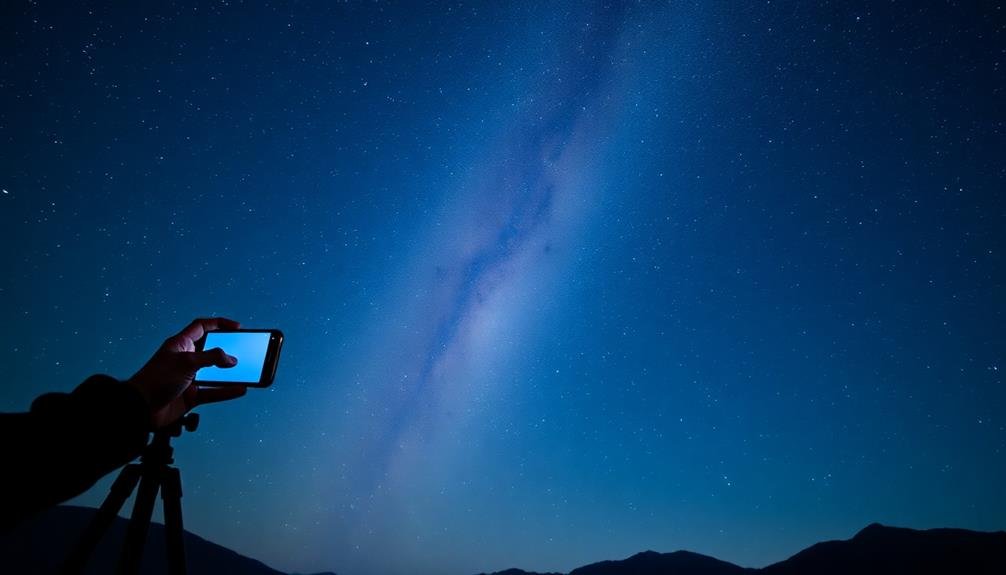
Use a Stabilizing Device

While manual settings are key for stellar night sky photos, keeping your phone steady during long exposures is equally important. You'll need a stabilizing device to prevent camera shake and blur. Tripods are the most common option, offering versatility and stability. For a lightweight alternative, consider a tabletop tripod or a flexible octopus-style tripod that can wrap around objects.
If you don't have a tripod, improvise with everyday items. Prop your phone against a rock, tree, or car hood. Use a bean bag or rolled-up jacket for added support. Remember to disable your phone's auto-rotation and use the timer or voice command to trigger the shutter, avoiding any movement from touching the screen.
| Stabilizing Device | Pros | Cons | Best For |
|---|---|---|---|
| Full-size Tripod | Very stable | Bulky | Planned shoots |
| Tabletop Tripod | Portable | Limited height | Travel |
| Flexible Tripod | Versatile | Less stable | Uneven surfaces |
| DIY Solutions | Free | Unpredictable | Spontaneous shots |
Experiment with different stabilizing methods to find what works best for your shooting style and location. With a steady setup, you'll capture sharper, more detailed night sky images that truly showcase the beauty of the stars.
Maximize Phone's Night Mode
Night mode is your phone's secret weapon for capturing stunning celestial scenes. To maximize its potential, start by ensuring your phone's software is up-to-date, as manufacturers often improve night mode capabilities with updates.
Next, familiarize yourself with your device's specific night mode settings. Some phones allow you to adjust exposure time, ISO, and focus manually within night mode.
When shooting, keep your phone as still as possible to reduce noise and blur. Use the timer function to avoid camera shake from pressing the shutter button.
Experiment with different exposure times; longer exposures can capture more light but may introduce star trails. If your phone supports RAW format in night mode, use it for greater post-processing flexibility.
Be patient and take multiple shots of the same scene. Night mode often combines several exposures, so slight variations between shots can yield different results.
Finally, don't be afraid to underexpose slightly; it's easier to bring out details in post-processing than to recover blown-out highlights.
With practice and these techniques, you'll be able to push your phone's night mode to its limits and capture breathtaking night sky images.
Find the Perfect Dark Location

The perfect dark location is essential for capturing stunning night sky photos with your phone. Look for areas far from city lights, ideally at least 20-30 miles away from major urban centers. National parks, remote beaches, and high-altitude locations often provide excellent dark sky conditions.
Use online tools like Dark Site Finder or Light Pollution Map to identify potential spots near you. Once you've found a promising location, consider these factors:
| Consideration | Importance | Tips |
|---|---|---|
| Moon phase | High | Choose nights with a new or crescent moon |
| Weather | Critical | Clear skies are a must; check forecasts |
| Elevation | Moderate | Higher altitudes often have clearer air |
When you arrive at your chosen location, give your eyes time to adjust to the darkness. This process, called dark adaptation, can take up to 30 minutes. During this time, avoid looking at your phone screen or any bright lights.
Remember to prioritize safety when venturing out at night. Bring a friend, inform others of your plans, and pack essentials like water, warm clothing, and a flashlight with a red filter to preserve your night vision.
Master Long Exposure Techniques

Mastering long exposure techniques is essential for capturing stunning night sky photos with your phone. You'll need to keep your device steady for several seconds or even minutes to allow enough light to reach the sensor. Use a tripod or prop your phone against a stable surface to eliminate camera shake.
Download a specialized night sky photography app that offers manual controls, allowing you to adjust settings like ISO, shutter speed, and focus.
Start with these basic settings:
- Set your ISO between 400-1600
- Choose a shutter speed of 15-30 seconds
- Set your focus to infinity
Experiment with different exposure times to find the right balance between capturing star trails and maintaining sharp pinpoints of light. For longer exposures, consider using the interval timer feature in your app to take multiple shots and stack them later. This technique helps reduce noise and creates more detailed images.
Don't forget to enable your phone's night mode if available, as it can greatly improve low-light performance.
Practice patience and take multiple shots, adjusting your settings as needed. With persistence, you'll soon be capturing breathtaking night sky photos that rival those taken with professional cameras.
Frequently Asked Questions
Can I Capture the Milky Way With My Smartphone Camera?
Yes, you can capture the Milky Way with your smartphone camera. You'll need a recent model with manual settings, a tripod, and dark skies. Use long exposure, high ISO, and wide aperture to reveal the galaxy's beauty.
How Do I Focus on Stars in Complete Darkness?
You'll need to focus manually in the dark. Try setting your camera to infinity focus or use the brightest star as a focal point. If available, use your phone's night mode or a long exposure app for better results.
What Apps Are Best for Editing Night Sky Photos?
You'll find several great apps for editing night sky photos. Try Snapseed, Adobe Lightroom Mobile, or Photoshop Express. They offer powerful tools to adjust exposure, contrast, and color balance, enhancing your starry captures. Don't forget to experiment with noise reduction features.
Are There Specific Weather Conditions Ideal for Night Sky Photography?
You'll want clear, dark skies with no moon for the best night sky photos. Low humidity and minimal light pollution are ideal. Cold nights often provide better visibility. Check weather apps for "astronomical forecasts" to plan your shoot.
How Can I Reduce Noise in Smartphone Astrophotography Without Losing Detail?
You can reduce noise in smartphone astrophotography by using longer exposures, lowering ISO, and shooting in RAW. Stack multiple images, use noise reduction apps, and try manual focus. Don't forget to stabilize your phone with a tripod.
In Summary
You've now got the tools to capture stunning night sky photos with your phone. Remember to tweak your manual settings, keep your device steady, and make the most of night mode. Don't forget to seek out the darkest spots and practice long exposure techniques. With these pro tricks up your sleeve, you'll be shooting jaw-dropping celestial images in no time. So grab your phone, head outside, and start capturing the magic of the night sky!


Leave a Reply